I was standing in my kitchen, staring at the ruined batch of brownies that had turned into a sticky, flour‑laden mess, when a friend called and challenged me to make the best gluten‑free chocolate almond brownies ever. The kitchen was a battlefield: flour clouds, a melted chocolate puddle, and the faint scent of burnt sugar. I could taste the disappointment, feel the frustration, and hear the echo of that “I can’t do this” voice that lives in every home chef. That moment of culinary despair became the spark that lit a fire in me, a fire that has now turned into a full‑blown love affair with this recipe.
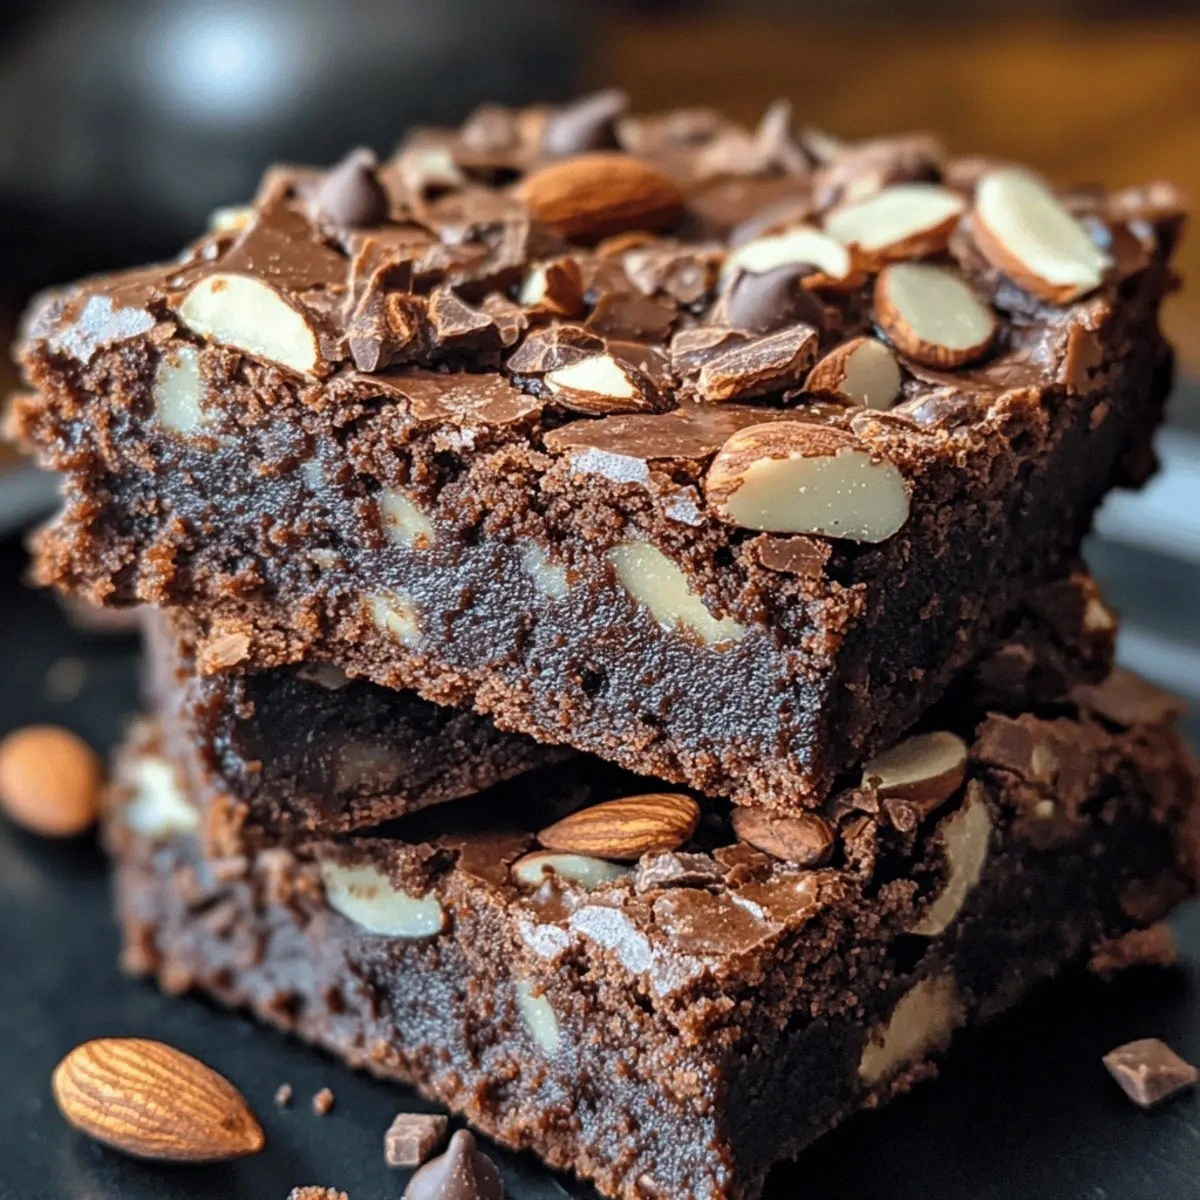
Picture yourself pulling this from the oven, the whole kitchen smelling like rich cocoa, toasted almonds, and a hint of vanilla. The first bite is a velvet‑smooth explosion of chocolate that shatters the usual dry, crumbly texture of gluten‑free brownies. I dare you to taste this and not go back for seconds, because once you start, you’ll be hooked. The batter is so silky that it almost feels like a dessert‑soup, but the final product is firm, fudgy, and utterly irresistible.
What sets this version apart is not just the ingredients, but the technique that turns ordinary gluten‑free baking into an art form. The blend of almond flour and cocoa powder creates a deep, nutty chocolate base that most recipes miss. The generous amount of eggs and butter gives the brownies that classic, buttery mouthfeel, while the chopped almonds add a satisfying crunch that’s a treat for the palate. If you’ve ever struggled with dry, crumbly gluten‑free brownies, you’re not alone — and I’ve got the fix. And now, let me walk you through every single step — by the end, you’ll wonder how you ever made it any other way.
I’ve spent months tweaking ratios, testing different brands of almond flour, and even experimenting with the type of chocolate chips to find the perfect balance. The result is a brownie that is moist, fudgy, and packed with flavor, with a texture that feels like a chocolate‑laden cookie on the inside and a crisp, slightly caramelized edge on the outside. This is hands down the best version you'll ever make at home, and it’s so simple you’ll forget you’re baking gluten‑free. Stay with me here — this is worth it.
What Makes This Version Stand Out
- Flavor: The combination of high‑quality cocoa powder and real chocolate chips delivers a deep, bittersweet taste that cuts through the sweetness of the sugar. The almond flour adds a subtle nutty undertone that complements the chocolate without overpowering it. This synergy gives the brownies a sophisticated, café‑style flavor.
- Texture: The generous use of eggs and butter creates a fudgy interior that clings to your teeth, while the almond flour keeps the batter from drying out. The result is a brownie that is moist yet firm enough to hold its shape when sliced. The chopped almonds add a delightful crunch that contrasts the softness.
- Simplicity: With just nine ingredients, you can whip up a batch that feels indulgent but requires minimal prep time. No need for specialty flours or add‑ons; everything you need is pantry‑friendly and gluten‑free. This makes it a go‑to recipe for busy evenings or last‑minute dessert needs.
- Uniqueness: The use of almond flour instead of the typical rice or oat flour gives the brownies a richer mouthfeel and a nuttier flavor profile. The addition of chopped almonds adds both texture and a subtle caramelized aroma that elevates the overall experience.
- Crowd Reaction: Friends who have never tasted gluten‑free brownies before are often left in awe, saying they taste like the real thing. The brownies are a crowd‑pleaser at parties, potlucks, or when you need to impress guests with a quick, impressive dessert.
- Ingredient Quality: Using high‑quality, organic almond flour and premium dark chocolate chips makes a noticeable difference in flavor. The natural sweetness of the almonds complements the bittersweet cocoa, creating a balanced taste that feels luxurious.
- Make‑Ahead Potential: Once baked, these brownies can be stored in an airtight container for up to a week, or frozen for longer periods. The flavor profile remains intact, and they can be reheated to bring back that fresh‑baked aroma.
- Cooking Method: The method involves a quick pre‑bake of the almond flour to bring out its nutty flavor, followed by a gentle, even bake that ensures consistent moisture. This two‑step process is key to achieving the perfect texture.
Alright, let's break down exactly what goes into this masterpiece...
Inside the Ingredient List
The recipe’s magic starts with a carefully curated list of ingredients, each playing a pivotal role in the final product. Understanding what each component brings to the table will help you tweak the recipe to your personal taste, while still maintaining the integrity of the brownies.
The Flavor Base
Almond flour is the cornerstone of this recipe. It provides the nutty backbone that pairs beautifully with chocolate, and its fine texture keeps the batter smooth. If you skip it, the brownies will lack body and will be more crumbly. A good tip: choose a finely ground almond flour to avoid a gritty finish. The flour also absorbs moisture, so it helps keep the brownies from drying out during baking.
Cocoa powder is the second star in the flavor lineup. A dark, unsweetened variety gives depth and richness to the chocolate flavor. If you use a sweetened cocoa, you’ll need to reduce the sugar to avoid an overly sweet brownie. A fun fact: cocoa beans are technically a fruit, and the fermentation process during drying is what creates the complex flavor notes we love.
The Sweetness Factor
Granulated sugar balances the bitterness of the cocoa and the natural tartness of almond flour. It also contributes to the caramelized crust that forms on the edges. If you prefer a lower sugar version, try substituting half the amount with a natural sweetener like maple syrup or coconut sugar, but be aware that this will affect the texture.
Eggs act as the binding agent, holding the batter together and giving the brownies structure. They also introduce a slight richness that mimics the mouthfeel of traditional brownies. Skipping eggs will result in a crumbly, dry texture. If you’re vegan, replace the eggs with flaxseed meal or a commercial egg replacer, but the texture will differ.
The Fat Component
Unsalted butter is the secret to a moist, luscious brownie. It melts into the batter, creating pockets of buttery flavor that contrast with the chocolate. The butter also helps in achieving that slightly caramelized edge. If you use oil instead, the brownies will be a bit denser and less rich.
Vanilla extract adds a warm, aromatic undertone that brightens the chocolate. Even a small amount can elevate the flavor profile, making it feel more complex. If you don’t have vanilla extract, a splash of almond extract can complement the nutty base, but be careful not to overpower the chocolate.
The Texture Crew
Salt is essential for balancing the sweetness and enhancing the chocolate flavor. A pinch is enough; too much can make the brownies taste metallic. If you’re sensitive to sodium, you can reduce the amount slightly, but the flavor will shift.
Chopped almonds provide a delightful crunch and a subtle caramelized flavor that adds depth to the brownie. They also contribute healthy fats, making the brownies a bit more filling. If you prefer a smoother texture, you can reduce the amount of almonds or pulse them into smaller pieces.
The Final Flourish
Chocolate chips are the star of the show, adding pockets of molten chocolate that melt in your mouth. They also create a contrast between the fudgy batter and the glossy chocolate centers. If you want a richer chocolate flavor, opt for dark chocolate chips with a higher cocoa content.
Everything’s prepped? Good. Let’s get into the real action...
The Method — Step by Step
Now that we’ve got everything prepped, it’s time to bring this batter to life. I’ll walk you through each step, sharing the sensory checkpoints that let you know the brownies are on the right track. This is the moment of truth. Don’t walk away from the stove here, because the next few minutes are where the magic happens.
- Preheat your oven to 350°F (175°C). Line an 8‑inch square baking pan with parchment paper, leaving a little overhang on each side. This will make it easy to lift the brownies out once they’re done. The aroma of preheated oil and butter already starts to tease your senses.
- In a large mixing bowl, combine the almond flour, cocoa powder, and salt. Whisk them together until the dry mixture is evenly distributed. This step ensures the chocolate flavor is consistent throughout.
- Melt the butter in a small saucepan over low heat or in a microwave. Once melted, let it cool slightly before adding it to the dry mix. The warm butter will help the flour absorb moisture, creating a smoother batter.
- Add the melted butter, granulated sugar, vanilla extract, and eggs to the dry mixture. Beat on medium speed until the batter is smooth and glossy. The mixture should have a thick, pourable consistency. Watch the batter rise as you whisk — that’s a good sign.
- Fold in the chopped almonds and chocolate chips gently with a spatula. The almonds should be evenly distributed, and the chips should sit in clusters for that classic chocolate burst. The batter will look slightly chunky, and that’s exactly what you want.
- Pour the batter into the prepared pan, spreading it evenly with a spatula. Tap the pan lightly on the counter to release any air bubbles. The batter should sit flat and smooth.
- Bake for 25–28 minutes, or until a toothpick inserted into the center comes out with a few moist crumbs. The edges should start pulling away from the pan, indicating a firm yet fudgy center. The aroma will be rich, chocolatey, and nutty.
- Remove from the oven and let the brownies cool in the pan for 10 minutes. Then lift them out using the parchment overhang and transfer to a wire rack to cool completely. This step allows the brownies to set and prevents them from becoming gummy.
- Once cooled, cut into squares. Serve immediately or store in an airtight container for up to a week. If you’re making them ahead, wrap them tightly in plastic wrap before freezing.
That’s it — you did it. But hold on, I've got a few more tricks that'll take this to another level. These insider tips will help you master the perfect brownie every single time.
Insider Tricks for Flawless Results
The Temperature Rule Nobody Follows
Many bakers bake at 375°F, but that high temperature can cause the edges to burn before the center sets. I always bake at 350°F, which gives the brownies a gentle, even rise and a chewy interior. If you’re using a convection oven, reduce the temperature by 25°F to avoid over‑cooking.
Why Your Nose Knows Best
Trust your nose when you’re baking. As soon as the batter starts to emit that warm, chocolatey scent, you know the butter is properly melted and the sugar is caramelizing. A friend once tried skipping this step and ended up with a raw, gritty brownie that tasted like unbaked flour.
The 5-Minute Rest That Changes Everything
After you remove the brownies from the oven, let them rest in the pan for exactly five minutes. This brief pause allows the interior to set, preventing them from becoming gummy when you cut into them. If you cut too early, the chocolate chips will spill out, ruining the presentation.
The “Crumb” Test
Instead of a toothpick, use a clean finger to press down on the center. The top should feel slightly springy but not mushy. This tactile test helps you gauge the exact doneness without risking a burnt edge.
The Chocolate‑Chip Trick
If you want a more intense chocolate flavor, sprinkle an extra handful of chocolate chips on top before baking. They’ll melt into the batter, creating a gooey, glossy finish. Just be sure to keep the pan level so the chips don’t spill over.
Creative Twists and Variations
This recipe is a playground. Here are some of my favorite ways to switch things up:
Almond Butter Swirl
Fold in a few tablespoons of almond butter into the batter for a nutty swirl that adds extra richness. The almond butter creates a marbled pattern when baked, and the flavor is deeper than plain almonds.
Sea Salt Caramel Drizzle
Drizzle melted sea salt caramel over the top after baking. The salty sweetness pairs perfectly with the chocolate, creating a sophisticated flavor profile that’s Instagram‑worthy.
Espresso Boost
Add a tablespoon of instant espresso powder to the dry mix. The espresso intensifies the chocolate flavor and adds a subtle bitterness that balances the sweetness.
Pistachio Crunch
Swap out half the almonds for chopped pistachios. The green pistachios add a bright color contrast and a slightly sweet, nutty flavor that complements the chocolate.
Coconut‑Infused Delight
Replace half the almond flour with shredded coconut. The coconut adds a tropical twist and a chewy texture that pairs wonderfully with the fudgy brownie base.
Raspberry Chia Layer
Spread a thin layer of raspberry jam and sprinkle chia seeds on top before baking. The jam adds a fruity tang, while the chia seeds give a subtle crunch and a boost of omega‑3s.
Storing and Bringing It Back to Life
Fridge Storage
Store brownies in an airtight container in the refrigerator for up to a week. The cool temperature keeps the chocolate firm and prevents the brownies from becoming stale. If you’re going to eat them after a day or two, let them sit at room temperature for 15 minutes to soften.
Freezer Friendly
Wrap each brownie individually in plastic wrap and then place them in a freezer bag. Freeze for up to three months. When you’re ready to enjoy, let them thaw at room temperature for 30 minutes. The texture will be slightly softer, but the flavor remains intact.
Best Reheating Method
To reheat, place a brownie on a microwave‑safe plate and heat on medium power for 15–20 seconds. Alternatively, bake in a preheated oven at 300°F for 5 minutes. Add a tiny splash of water before reheating to steam back to perfection.