Picture this: I was halfway through a midnight baking session, the kitchen lights flickering like a disco ball, when the oven alarm blared. I had just pulled a batch of chocolate chip cookies that looked like glossy dark moons, yet the aroma was oddly flat, as if the sugar had taken a nap. The disaster was instant—I tasted one, and it was a sad, chewy disappointment that made me swear off baking forever. Then, a friend dared me to whip up something that would make my taste buds dance and my Instagram stories go viral. I accepted the challenge, and that night I stumbled upon a recipe that would forever change my dessert game.
The first bite was a revelation. The crust was crisp like a freshly fallen leaf, yet the crumb stayed tender, almost buttery. The filling was silky, with a faint tang that cut through the sweetness of the berries like a cool breeze on a hot day. The whole dish was a symphony of textures: the snap of the crust, the luscious glide of the cream cheese base, and the burst of juicy fruit that exploded with each forkful. It wasn’t just a dessert; it was an experience, a small, edible celebration that turned a kitchen mishap into a triumph.
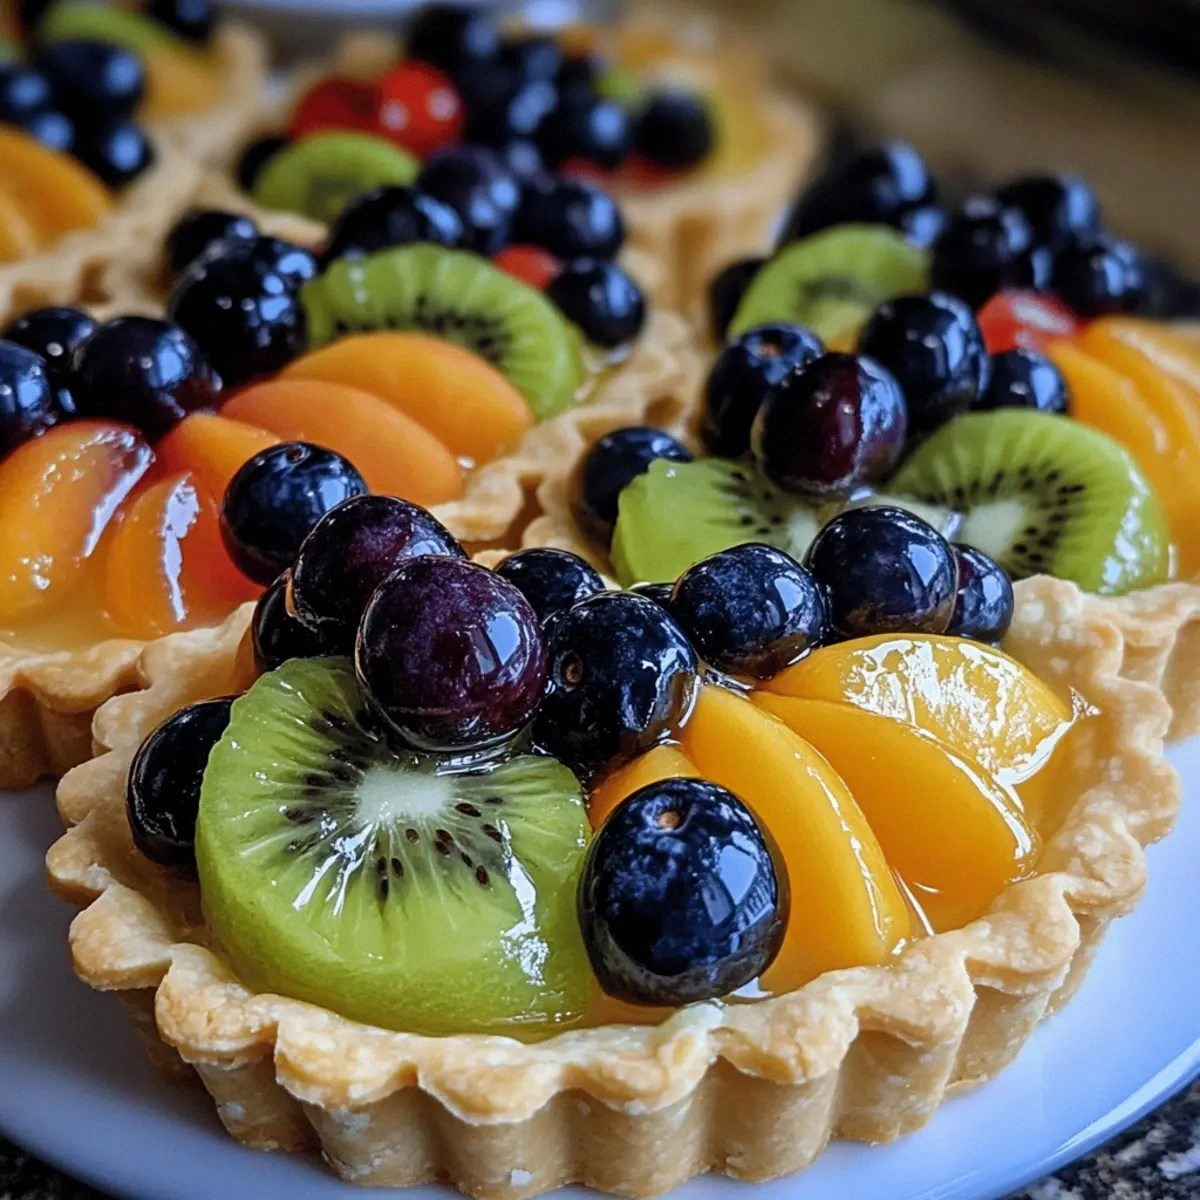
What makes this version stand out? It’s not just the ingredients; it’s the meticulous balance between simplicity and sophistication. The crust is a masterclass in texture, with a buttery crumb that melts in your mouth, while the filling is a velvety cloud that carries the freshness of berries like a delicate perfume. The apricot glaze adds a glossy, caramelized finish that gives the tarts a show-stopping shine. I dare you to taste this and not go back for seconds, because once you’ve had a bite, you’ll crave that buttery snap and that sweet, tangy burst again and again. If you’ve ever struggled to get the crust just right, you’re not alone — and I’ve got the fix. This is hands down the best version you’ll ever make at home.
I’ll be honest— I ate half the batch before anyone else got to try it, and the kitchen still smelled like a sweet, buttery paradise. Most recipes get this completely wrong, with crusts that are either too dry or too soggy. Here’s what actually works: a precise ratio of flour to butter, a dash of sugar to caramelize the edges, and a pinch of salt to bring everything together. Picture yourself pulling this out of the oven, the whole kitchen smelling incredible, and the little cups gleaming with a glossy glaze that invites you to dig in. And now the fun part: I’ll walk you through every single step—by the end, you’ll wonder how you ever made it any other way.
The next time you’re in the mood for something sweet and sophisticated, this recipe should be your go-to. It’s a quick, elegant treat that looks as good on a brunch table as it does on a dessert platter. It’s also a conversation starter—people will ask where you got the idea, and you can brag about mastering the perfect mini fruit tartle. So grab your apron, preheat that oven, and let’s get started on a dessert that’s as delightful to make as it is to eat.
Before we dive into the kitchen wizardry, let’s take a moment to appreciate the artistry behind each component. From the buttery crust to the silky filling, every element plays a pivotal role in creating a harmonious bite. The key is in the details—precise measurements, careful mixing, and a little bit of patience. And if you’re wondering whether this is worth the effort, trust me, the payoff is worth every second. Ready? Let’s break down exactly what goes into this masterpiece.
Now, let’s talk about what makes this version of mini fruit tartles truly irresistible. I’ve distilled the secrets into a handful of bullet points that’ll give you the edge you need to nail it every time.
- Taste: The filling is a creamy, slightly tangy canvas that lets the berries shine, while the crust provides a buttery crunch that balances the sweetness.
- Texture: The crumbly, flaky crust is paired with a silky cream cheese base, creating a multi-layered mouthfeel that’s both comforting and sophisticated.
- Simplicity: With just 12 ingredients, this recipe feels approachable, yet the final result is impressive enough for a dinner party.
- Uniqueness: The apricot glaze gives a subtle caramelized finish that most tart recipes lack, adding depth and visual appeal.
- Crowd Reaction: Guests love the bite-sized portions and the colorful presentation—perfect for a potluck or a dessert spread.
- Ingredient Quality: Fresh, high‑quality berries and real cream cheese make the difference between a good and a great tart.
- Cooking Method: A two‑stage bake—first the crust, then the filling—ensures each component is cooked to perfection.
- Make‑Ahead: The tarts can be assembled a day ahead and chilled, making them a stress‑free dessert for busy evenings.
Inside the Ingredient List
The Flavor Base
All‑purpose flour: It’s the backbone of the crust, providing structure and a neutral canvas for the butter’s richness. A fine grind ensures a tender crumb, while a coarser texture can make the crust chewy. If you’re gluten‑free, swap for a 1:1 blend of gluten‑free flour and a tablespoon of xanthan gum.
Unsalted butter: Butter is the star of the crust, giving it that signature melt‑in‑your‑mouth buttery flavor. Using unsalted allows you to control the salt level precisely. For an extra touch of flavor, chill the butter until it’s cold but not hard—this helps create a flaky texture.
Granulated sugar: It caramelizes during baking, adding a subtle sweetness and a golden crust. The sugar also helps bind the dough together. If you’re watching sugar intake, replace it with a 1:1 ratio of honey or maple syrup, but be aware the dough will be slightly stickier.
Salt: A pinch of salt elevates the flavors and balances the sweetness. Too much salt can overpower the delicate berries, while too little can make the crust taste flat. Use fine sea salt for a smoother finish.
Ice water: It’s the secret to a tender crust. The cold water keeps the butter from melting during mixing, preventing a greasy dough. Add it slowly, just until the dough comes together; too much water will make the crust dense.
The Texture Crew
Cream cheese: This is the heart of the filling—rich, creamy, and slightly tangy. It provides body and a silky mouthfeel that holds the berries in place. For a lighter version, substitute with mascarpone or a blend of cream cheese and Greek yogurt.
Powdered sugar: It dissolves quickly, giving the filling a smooth, sweet finish. Powdered sugar also helps stabilize the cream cheese mixture, preventing it from curdling. If you’re avoiding refined sugar, use raw cane sugar or a sugar alternative that can be powdered.
Vanilla extract: Vanilla adds depth and warmth, cutting through the sweetness of the berries and the richness of the cream cheese. A good quality vanilla extract, rather than imitation, will make a noticeable difference. A splash of almond extract can also give a subtle twist.
Heavy cream: It lightens the filling, giving it a fluffy, airy texture that contrasts nicely with the dense crust. Heavy cream also helps the glaze set properly. If you’re looking for a lighter option, replace with half-and-half or a non‑dairy milk that’s thick.
The Unexpected Star
Fresh berries: They’re the star of the show—juicy, sweet, and slightly tart. The natural sugars in berries complement the creamy filling and brighten the overall flavor profile. Choose berries that are in season for the best taste, or use a mix for a rainbow effect.
Kiwi or mango slices: These add a tropical twist, providing a burst of sweet, slightly acidic flavor that balances the richness. They also add a pop of color and a slightly chewy texture. If you’re allergic, simply omit them; the tarts will still shine.
The Final Flourish
Apricot glaze: The glaze is what turns a simple tart into a showstopper. It gives a glossy finish that looks like a sweet, golden glaze, and it caramelizes slightly on the surface, adding a hint of caramel flavor. If you don’t have apricot glaze on hand, a simple apricot jam diluted with a splash of water works well.
Everything’s prepped? Good. Let’s get into the real action.
The Method — Step by Step
- Preheat your oven to 350°F (175°C). Line a mini muffin tin with paper liners or lightly grease it with butter. This step ensures the crusts bake evenly and don’t stick. I love to sprinkle a pinch of sea salt on the liners for a subtle crunch.
- In a large bowl, whisk together the flour, granulated sugar, and 1/4 teaspoon of salt. The mixture should look like fine sand. This dry blend will keep the dough from becoming too sticky during mixing.
- Add the cold, diced butter to the dry mixture. Using a pastry cutter or your fingertips, cut the butter into the flour until the mixture resembles coarse crumbs. The butter should be visible in the dough, like tiny specks of sunshine.
- Slowly drizzle in the ice water, 1 tablespoon at a time, and mix until the dough just comes together. Don’t overmix; a few lumps are fine. The dough should be firm enough to hold its shape when pressed.
- Press the dough evenly into the bottom of each muffin cup, using a flat-bottomed glass or the back of a spoon. The crust should be about 1/4 inch thick. This is the moment of truth—your crust will set the stage for the filling.
- Bake the crusts for 12–15 minutes, or until they’re lightly golden. The edges should pull away slightly from the tin. While the crusts bake, you’ll notice a faint, buttery aroma that’s practically a prelude to the filling.
- While the crusts are cooling, prepare the filling. In a bowl, beat the cream cheese until smooth, then add powdered sugar, vanilla, and heavy cream. Mix until the filling is silky and glossy—no lumps.
- Spoon the cream cheese mixture into each cooled crust, filling them about 3/4 full. Gently tap the tin on the counter to release any air pockets. The filling should sit on top of the crust, creating a smooth, creamy surface.
- Top each tart with a generous scoop of fresh berries and a slice of kiwi or mango. Drizzle apricot glaze over the fruit, letting it pool slightly on the sides. The glaze should set into a glossy sheen within minutes, giving the tarts a professional finish.
- Place the tarts in the refrigerator for at least 30 minutes to let the filling set. The cold will also help the glaze to thicken. When you’re ready to serve, pop them out, and watch the glaze glisten like a tiny sun.
- Serve chilled, and enjoy the burst of flavor with every bite. If you’re serving at a gathering, arrange them on a platter and let guests pick their favorite. The presentation is as important as the taste—think a mini gallery of sweet art.
That’s it—you did it. But hold on, I’ve got a few more tricks that’ll take this from great to unforgettable. These insider tips are the secret sauce that turns a good dessert into a crowd‑pleaser.
Insider Tricks for Flawless Results
The Temperature Rule Nobody Follows
Most bakers bake the crust at a high temperature, but this recipe calls for a lower, gentler bake. The 350°F setting allows the butter to melt slowly, creating a flaky, tender base. If you bump the temperature, the crust will brown too quickly and become tough.
Why Your Nose Knows Best
Trust your senses—if the crust starts smelling like toasted butter, it’s done. The aroma is a reliable indicator that the sugar has caramelized just enough. I once overbaked a batch, and the scent of burnt sugar made me regret it instantly.
The 5-Minute Rest That Changes Everything
After baking the crust, let it rest for 5 minutes before filling. This pause lets the steam escape, preventing a soggy bottom. A quick rest also gives you a chance to check the crust’s color and texture.
Keep the Fruit Fresh
Berries tend to brown quickly. Toss them with a light sprinkle of lemon juice to keep them bright. If you’re using kiwi, slice it just before assembly to preserve its color.
A Touch of Salt in the Filling
Adding a pinch of sea salt to the cream cheese mixture brings out the fruit’s natural sweetness. It’s a subtle tweak that elevates the overall flavor profile. I always keep a small container of sea salt handy for this.
Serve with a Whipped Cream Accent
A dollop of freshly whipped cream on top of each tart adds a luxurious finish. It balances the tartness of the berries and the richness of the glaze. If you’re in a hurry, a quick swirl of store‑bought whipped cream works just fine.
These tricks are the little details that separate a decent dessert from a memorable one. Try them out, and you’ll see how a simple tweak can elevate the entire experience.
Creative Twists and Variations
This recipe is a playground. Here are some of my favorite ways to switch things up:
Chocolate‑Berry Surprise
Swap the fresh berries for dark chocolate shards and drizzle a thin layer of melted chocolate over the top. The bitterness of the chocolate pairs beautifully with the sweet cream cheese base. It’s a decadent twist that feels like a dessert for adults.
Citrus Zest Infusion
Add a tablespoon of lemon zest to the filling to give it a bright, citrusy kick. The zest’s oils enhance the fruit’s flavor and add a subtle aroma. This variation is perfect for springtime gatherings.
Almond Crunch Layer
Sprinkle toasted almond slivers between the crust and the filling. The crunch adds a delightful contrast to the smooth cream cheese. The nutty flavor also deepens the overall taste profile.
Maple‑Honey Swirl
Replace the heavy cream with a mix of maple syrup and honey for a sweet, earthy undertone. The natural sugars give the filling a caramelized flavor that complements the berries. It’s a great option for fall-inspired desserts.
Exotic Fruit Fusion
Incorporate diced dragon fruit and passion fruit into the berry mix for a tropical flair. The vibrant colors and unique flavors create a visually stunning tart. This variation is a conversation starter at any party.
Savory Twist
Add a pinch of smoked paprika to the crust for a subtle smoky undertone. Pair it with figs and a drizzle of honey for a savory-sweet balance. This version works surprisingly well as an appetizer.
Feel free to experiment—desserts are all about creativity and taste. The key is to keep the core structure intact while letting your imagination run wild.
Storing and Bringing It Back to Life
Fridge Storage
Store the assembled tarts in an airtight container in the refrigerator for up to 3 days. Keep the glaze on the outside to prevent it from absorbing moisture. When you’re ready to serve, let them sit at room temperature for 10 minutes to soften slightly.
Freezer Friendly
If you need to keep them longer, freeze the crusts before filling. Wrap each crust in plastic wrap and place them in a freezer bag. When ready, bake the crusts at 350°F for 10 minutes, then add the filling and chill. They’ll keep up to 2 months in the freezer.
Best Reheating Method
To reheat, place the tarts in a preheated oven at 300°F for 5 minutes. Add a splash of water to the bottom of the pan to create steam, which keeps the crust from drying out. This gentle reheating preserves the texture and flavor.