Picture this: I’m standing in a cramped kitchen, the holiday lights flickering like a nervous heartbeat, and I’ve just dropped a tub of cheesecake into the oven. The smoke alarm blares, the timer dings, and everyone’s eyes are on me. The cheesecake, however, was a disaster—too thick, too sweet, and the crust was a soggy mess. That night, my friends begged for a dessert that would make their taste buds sing, and I promised a triumph that would become the talk of the season.
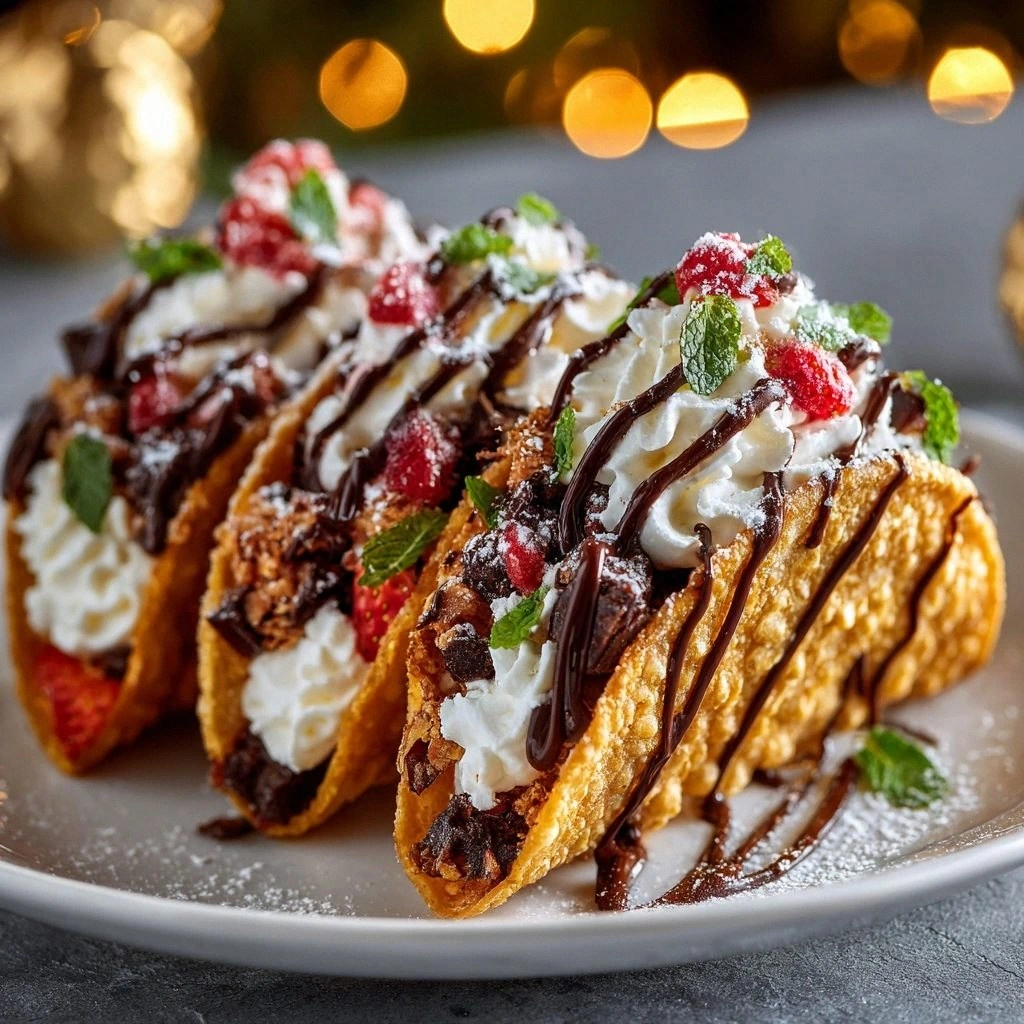
I’ve spent the past decade experimenting with desserts that feel like a hug in a bowl, but this time I wanted something that feels like a bite of holiday cheer. I imagined a crisp taco shell, a velvety cheesecake filling, and a burst of minty peppermint crunch—all wrapped in a single bite. The kitchen was alive with the scent of vanilla, the sound of the mixer whirring, and the gentle pop of the taco shells crisping. My hands moved with confidence, guided by the rhythm of the recipe. By the time I plated the first taco, the room was filled with the sweet, buttery aroma that made everyone’s mouths water.
What makes this version stand out is that it’s not just a cheesecake in a shell; it’s a layered experience that plays with texture and flavor. The taco shell provides a satisfying crunch that contrasts with the silky filling, while the peppermint candies add a festive crunch and a refreshing mint finish. The combination of strawberries and kiwi offers a tart counterpoint to the sweet cream, creating a harmonious balance. And the best part? It’s so easy to assemble that you can make it on the fly for guests who arrive early or for those who need a quick dessert between courses.
I dare you to taste this and not go back for seconds—because it’s that addictive. The first bite is a burst of creamy cheesecake that melts in your mouth, followed by the subtle crunch of the shell, and the final pop of peppermint that lingers like a holiday memory. The next part? Pure magic. Picture yourself pulling these out of the oven, the whole kitchen smelling incredible, and your guests’ faces lighting up as they take their first bite. And that’s just the beginning. Let me walk you through every single step — by the end, you’ll wonder how you ever made it any other way.
What Makes This Version Stand Out
- Texture: The crispy taco shell provides a satisfying crunch that contrasts beautifully with the smooth, velvety cheesecake filling. The shell’s edges crackle when you bite into it, creating a delightful sound that elevates the sensory experience.
- Flavor Layering: The combination of vanilla, mint, and fruit creates a flavor profile that dances on your palate. Each bite offers a new note, from the sweet cream to the tart berries, ensuring no single flavor dominates.
- Festive Appeal: The peppermint candies give it a holiday twist that feels both playful and sophisticated. The bright red and white colors add a visual pop that’s perfect for Christmas parties.
- Make‑Ahead Friendly: The filling can be prepared a day ahead, and the tacos can be assembled just before serving. This flexibility makes it a stress‑free option for busy holiday hosts.
- Ingredient Quality: Using high‑quality cream cheese and fresh fruit elevates the dish, ensuring a richer taste that feels like a premium dessert.
- Ease of Assembly: No need for a fancy mold or complex equipment—just a few shells, a mixing bowl, and a spoon. The recipe is approachable for both seasoned cooks and beginners.
Inside the Ingredient List
The Flavor Base
The foundation of this dessert is the creamy cheesecake filling. Cream cheese is the star, and it gives the filling its signature richness. Softening it at room temperature before mixing prevents lumps and ensures a silky texture. Powdered sugar sweetens the mixture while also helping to stabilize the creaminess. Vanilla extract adds depth; if you’re feeling adventurous, try almond extract for a nutty twist.
The Texture Crew
Heavy whipping cream is the secret to that airy, cloud‑like mouthfeel. When whipped to soft peaks before folding into the cheese, it creates a lightness that contrasts with the dense shell. The taco shells themselves are the crunchy counterpoint, providing a satisfying bite that shatters like thin ice. If you’re gluten‑free, replace the shells with gluten‑free tortillas for a similar crunch.
The Unexpected Star
Crushed peppermint candies bring a festive crunch and a burst of minty flavor that cuts through the sweetness. They’re not just a garnish; they’re an integral part of the flavor profile. If you prefer chocolate, swap them for chocolate shavings to create a mocha‑mint hybrid. This small change can transform the dessert’s mood from classic holiday to indulgent chocolate‑mint.
The Final Flourish
Toppings of fresh strawberries and kiwi add a pop of color and a tart contrast that brightens the dish. The berries’ acidity balances the rich cheesecake, preventing the dessert from feeling cloying. Whipped cream is the finishing touch, adding a cloud of airy sweetness that ties everything together. If you’re short on time, store‑bought whipped cream works just fine, but homemade gives that extra homemade feel.
Everything’s prepped? Good. Let’s get into the real action. The steps are straightforward, but each one is essential to achieve that perfect balance of flavors and textures.
The Method — Step by Step
- Preheat your oven to 350°F (175°C). Arrange the taco shells on a baking sheet and bake for 6–8 minutes, or until they’re golden and crisp. While they bake, keep an eye on them—they can go from perfect to burnt in seconds. Once baked, let them cool completely on a wire rack; this prevents them from becoming soggy when filled.
- In a large mixing bowl, beat the softened cream cheese on medium speed until smooth and creamy. The goal is a lump‑free base; a whisk or a hand mixer works well. This step is crucial because any lumps will carry through to the final filling.
- Add powdered sugar and vanilla extract to the cream cheese and continue beating until the mixture is light and fluffy. The sugar not only sweetens but also helps achieve that silky texture. The vanilla brings depth—think of it as the aromatic undertone that lingers.
- Whip the heavy cream to soft peaks in a separate bowl. Fold the whipped cream into the cheesecake mixture gently, using a spatula in a folding motion to maintain the airy structure. This incorporation is key; over‑mixing can deflate the lightness.
- Divide the filling evenly among the cooled taco shells, filling each shell to the top. The filling should be thick enough to stay in place, but not so thick that it overflows. The first bite should feel like a creamy cloud inside a crunchy shell.
- Sprinkle crushed peppermint candies over the top of each taco shell, pressing them gently into the filling so they stick. The peppermint’s crunch provides a festive texture that contrasts the softness of the cream. This step also adds a minty aroma that’s unmistakably holiday.
- Arrange diced strawberries and kiwi on top of the peppermint. The berries should be bright red and juicy, while the kiwi adds a green pop of color. Their natural acidity cuts through the sweetness, creating a balanced flavor profile.
- Finish each taco with a dollop of whipped cream, creating a soft, cloud‑like topping. This final touch adds a touch of elegance and a creamy contrast to the minty crunch. Serve immediately to enjoy the shells while still crisp.
That’s it — you did it. But hold on, I’ve got a few more tricks that’ll take this to another level. From the way you chill the shells to the exact timing of adding the fruit, each detail is a small tweak that makes a big difference.
Insider Tricks for Flawless Results
The Temperature Rule Nobody Follows
Many people bake the shells at a high temperature for a quick crunch, but that often leads to uneven edges. Instead, bake at 350°F for 6–8 minutes, then finish at 400°F for 2 minutes to set the edges. This two‑step approach gives you a shell that’s both crisp and sturdy, preventing it from collapsing under the creamy filling.
Why Your Nose Knows Best
Trust your nose when the shells start to emit a toasted aroma. That scent is a reliable indicator that they’re ready. If you’re impatient, you might skip the aroma cue and risk under‑baking, which leads to soggy shells that soak up the filling.
The 5-Minute Rest That Changes Everything
After assembling the tacos, let them rest for 5 minutes before serving. This brief pause allows the flavors to meld and the peppermint to settle into the filling. It also gives the shells a moment to firm up, so they stay crisp longer.
The Secret to a Fluffy Filling
Whip the heavy cream to soft peaks, not stiff. Soft peaks keep the filling light and airy, whereas stiff peaks can make the mixture dense. When folding the whipped cream into the cheese mixture, use a gentle motion to preserve the volume.
The Quick Chill Trick
If you’re short on time, place the filled shells in the refrigerator for 15 minutes before serving. This quick chill sets the filling, ensuring that the shells don’t become soggy. The chill also enhances the minty flavor of the peppermint.
Creative Twists and Variations
This recipe is a playground. Here are some of my favorite ways to switch things up:
Chocolate Peppermint Surprise
Swap the crushed peppermint candies for chocolate shavings. Add a drizzle of melted dark chocolate over the filling for a decadent twist that pairs perfectly with the creamy base.
Citrus Burst
Replace strawberries with thinly sliced oranges or mandarins. The citrus zest adds a bright, zesty layer that cuts through the richness of the cheesecake.
Nutty Crunch
Add chopped toasted almonds or pecans on top of the filling. The nutty crunch introduces a new texture and a subtle nutty flavor that complements the mint.
Berry Medley
Use a mix of blueberries, raspberries, and blackberries instead of strawberries and kiwi. The variety of berries adds depth and a burst of color, making the dessert even more visually appealing.
Savory Surprise
For a savory version, replace the powdered sugar with a pinch of sea salt and add a splash of lemon juice. This creates a sweet‑savory balance that’s unexpected and delicious.
Storing and Bringing It Back to Life
Fridge Storage
Store assembled tacos in an airtight container in the refrigerator for up to 2 days. Keep the whipped cream separate until serving to maintain its airy texture. When ready to serve, let them sit at room temperature for 10 minutes to soften slightly.
Freezer Friendly
Freezing is not recommended for the filled shells, as the texture of the taco shell will soften. However, you can freeze the filling separately in a freezer‑safe container for up to 1 week. When ready, thaw in the refrigerator and spoon into fresh shells.
Best Reheating Method
If you must reheat, place the shells on a baking sheet and warm them in a preheated 350°F oven for 3–4 minutes. Add a tiny splash of water to the filling before reheating; it steams the cheesecake back to perfection, preserving its creamy texture.