The moment my kitchen turned into a coffee‑sugar avalanche was the spark that ignited this recipe. I had been juggling a blender, a saucepan, and a bag of instant coffee when a rogue banana slipped and landed on the floor, splattering the entire countertop. The kitchen smelled like burnt sugar and espresso, and I felt the frustration of a failed dessert rise to the surface. But the disaster was also a delicious promise: if I could salvage that mess into something sweet, I would have a new staple for the house. I’m not just talking about a simple treat; this is a game‑changing, creamy, coffee‑laden creation that will rewrite your dessert playbook.
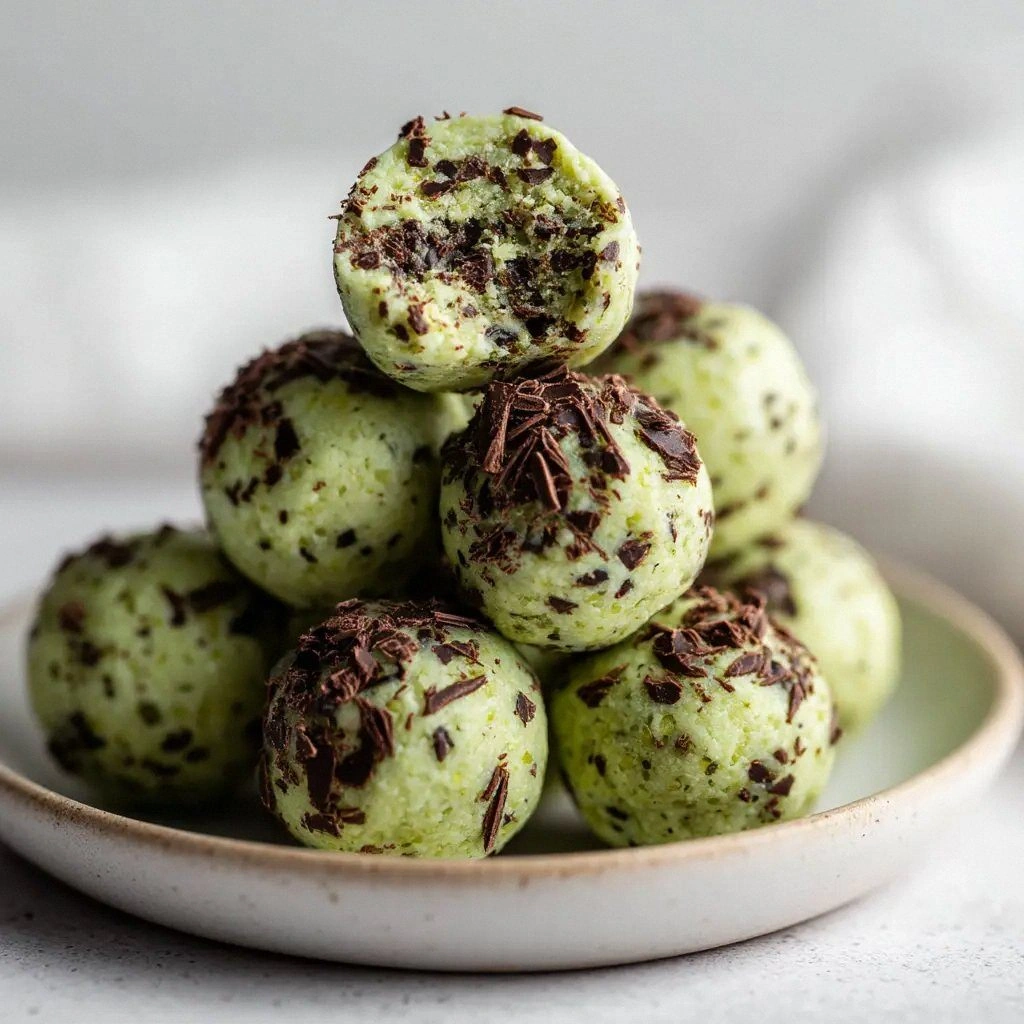
Picture the scene: a glossy, dark brown batter swirling in a bowl, the aroma of roasted coffee beans mingling with the sweet scent of ripe bananas and maple syrup. The sound of the whisk hitting the bowl is like a drumbeat, each stir building anticipation. When you take the first bite, the instant coffee’s boldness is tempered by the mellow sweetness of bananas, while the peanut butter adds a silky, nutty undertone that coats your tongue like velvet. The coconut cream brings a tropical whisper that balances the coffee’s bitterness, creating a harmony that feels like a quiet summer evening in a café. The texture is a paradox—smooth as a latte foam but with a subtle, satisfying bite from the almonds.
What makes this version stand out from every other coffee dessert out there is not just the ingredient list but the method that preserves and amplifies each flavor. I’ve experimented with countless coffee‑based desserts, and this one hits every sweet spot—rich, creamy, and utterly addictive. The use of ripe bananas as the base gives it natural sweetness and a creamy texture that eliminates the need for heavy cream or sugar. The instant coffee, toasted lightly, unlocks deep flavor notes that linger on the palate. And the final touch—an almond crunch—provides a delightful contrast that keeps the mouth moving. I dare you to taste this and not go back for seconds.
If you’ve ever been disappointed by a coffee dessert that falls flat or tastes like a coffee‑sugar mash, you’re not alone. That’s why I’m here to walk you through every single step—by the end, you’ll wonder how you ever made it any other way. Picture yourself pulling this out of the oven, the whole kitchen smelling incredible, and your guests’ faces lighting up with that “wow” moment. Stay with me, because this next part? Pure magic. And if you’re ready for the ultimate coffee experience, let’s dive in.
What Makes This Version Stand Out
- Flavor Depth: The combination of instant coffee and maple syrup creates a layered taste that’s both bitter and sweet, reminiscent of a perfectly brewed espresso shot with a splash of caramel. This balance ensures that each bite is a journey rather than a single flavor note. The coffee’s boldness never overpowers the banana’s natural sweetness, making it approachable for coffee lovers and dessert enthusiasts alike.
- Texture Play: The bananas provide a creamy base that rivals dairy, while the coconut cream adds a silky mouthfeel that melts in your mouth. The almonds or peanuts introduce a satisfying crunch that breaks the smoothness, creating a multi‑sensory experience. This contrast keeps the palate engaged and makes the dessert feel both indulgent and light.
- Ingredient Simplicity: With only nine ingredients, this recipe is a masterclass in how fewer components can produce a complex flavor profile. You don’t need to hunt for exotic spices or specialty powders—everything you need is in your pantry or local grocery store. This simplicity makes it a go‑to dessert for busy weeknights or last‑minute gatherings.
- Make‑Ahead Potential: Once the mixture is set, it can be stored in the fridge for up to five days or frozen for longer. The coffee flavor only deepens with time, so you can prepare this dessert ahead of a big event and let it sit to develop its full character. It’s the perfect solution for those who want a high‑quality dessert with minimal last‑minute prep.
- Health‑Friendly Twist: By using ripe bananas, natural maple syrup, and coconut cream, this recipe cuts down on refined sugars and saturated fats. The peanut butter adds protein and healthy fats, making it a more balanced treat compared to traditional ice cream or custard. It’s a dessert that satisfies cravings without the guilt.
- Versatility: The base can be adapted to different dietary preferences—swap the coconut cream for Greek yogurt for a tangier flavor, or use a dairy‑free peanut butter for a vegan version. The almonds or peanuts can be replaced with pistachios or cashews for a different crunch. This adaptability makes it a staple that can be customized for any guest.
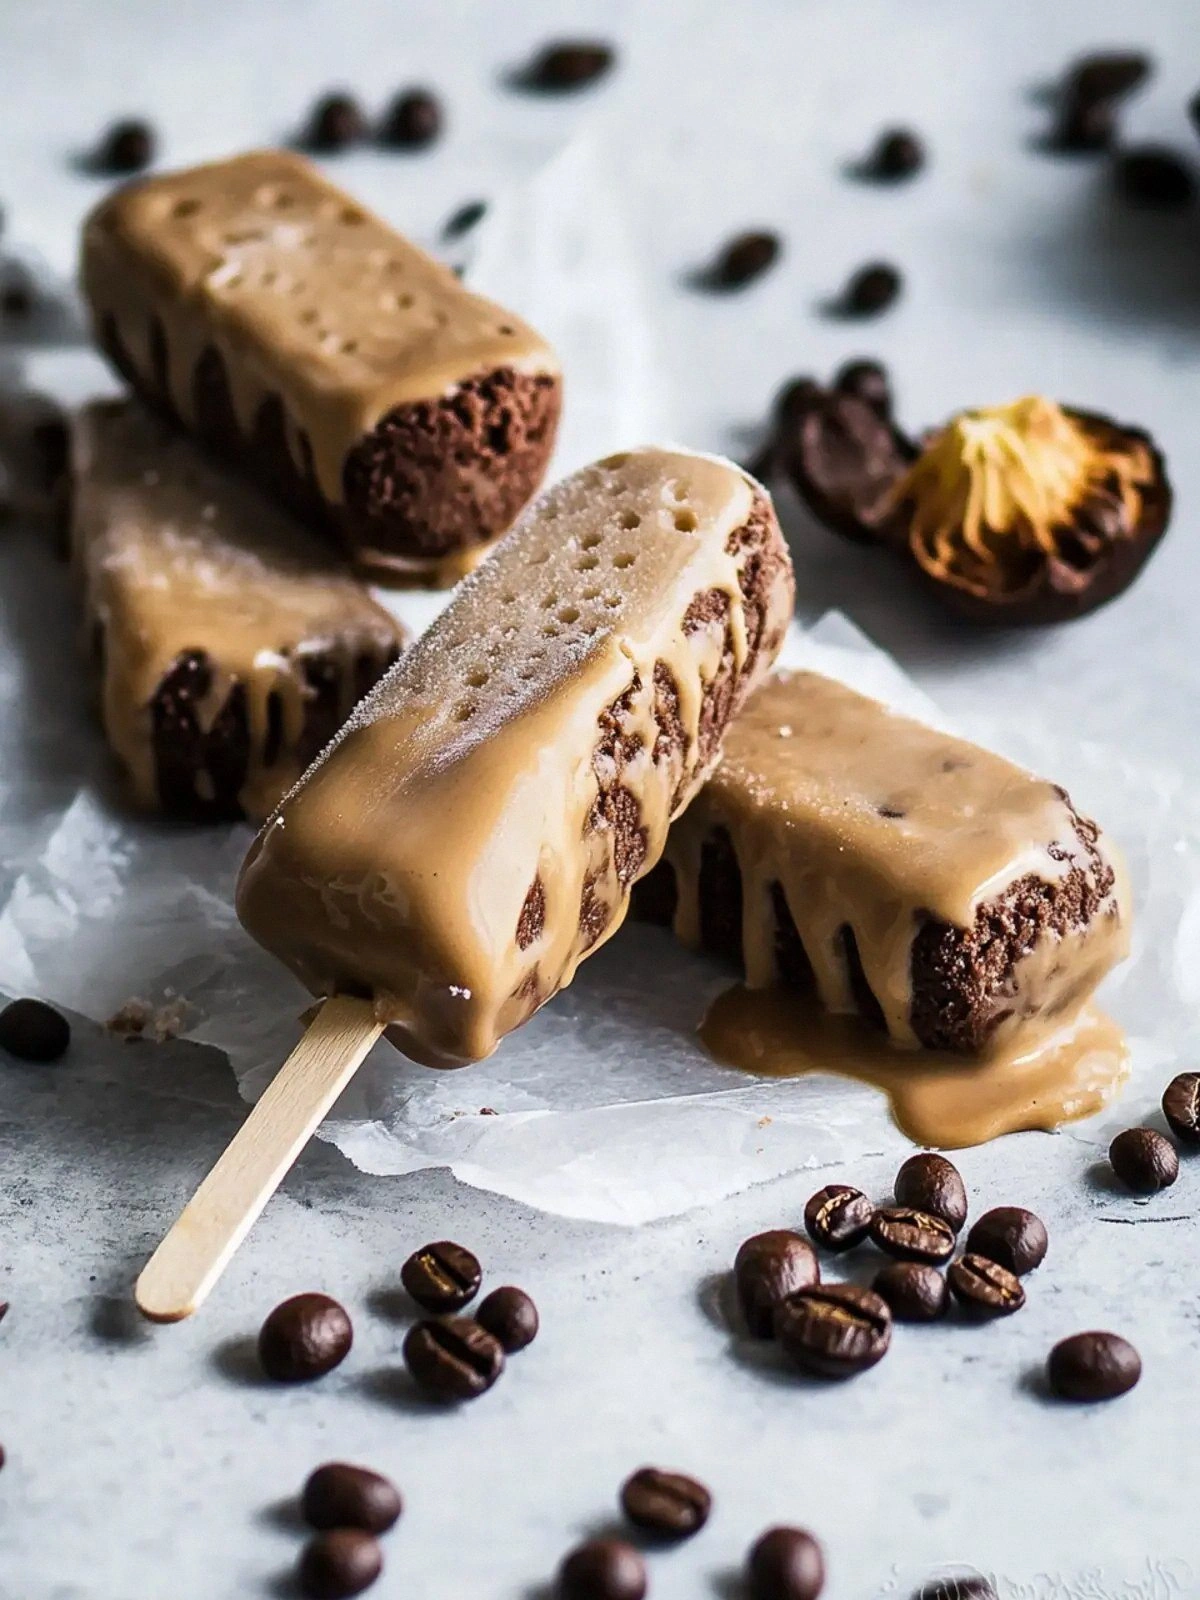
- Presentation Wow: When plated, the glossy surface of the ice cream bars glistens like a polished espresso cup, and the almond slivers add a touch of gold. The bars can be served with a drizzle of extra maple syrup or a dusting of cocoa powder for an extra flourish. It’s a dessert that looks as good as it tastes, perfect for photo‑ready moments.
Inside the Ingredient List
The Flavor Base
Bananas: The ripe bananas are the heart of this dessert, providing natural sweetness and a dense, creamy texture that replaces dairy. They also contain potassium, which gives a subtle mineral note that balances the coffee. Skipping bananas would turn this into a thin, watery mixture that lacks body. For a sweeter version, use very ripe bananas that are almost brown on the outside.
Maple Syrup (Base): Maple syrup introduces a caramelized, earthy sweetness that complements the coffee’s bitterness. It also adds a slight viscosity, helping the mixture set into a firm yet creamy consistency. If you’re looking for a lower‑calorie option, replace half of the maple syrup with honey or agave nectar, but note the flavor shift.
Instant Coffee: This is the flavor engine, delivering a robust coffee punch without the need for a full pot. Toasting the coffee in a dry pan for a minute before adding it to the batter unlocks deeper, nutty undertones. If you’re sensitive to caffeine, reduce the amount by half or use decaf instant coffee.
The Texture Crew
Peanut Butter: Peanut butter adds protein, healthy fats, and a nutty richness that coats the palate. It also helps bind the mixture, giving the dessert a smooth, cohesive structure. If you’re allergic to peanuts, substitute with almond or sunflower seed butter for a similar mouthfeel.
Coconut Cream: Coconut cream brings a tropical, silky texture that melts in the mouth, offsetting the coffee’s sharpness. It also provides a subtle coconut aroma that lingers, enhancing the overall flavor profile. For a lighter version, use a lower‑fat coconut cream or replace it with coconut milk; just be prepared for a slightly looser consistency.
Cocoa Powder: The cocoa powder gives a hint of chocolate that deepens the coffee flavor and adds a velvety finish. It also balances the sweetness, preventing the dessert from feeling too syrupy. If you prefer a chocolatey dessert, increase the cocoa powder to a full 1/2 cup, but watch the texture as it may become thicker.
The Unexpected Star
Melted Coconut Oil: Coconut oil adds a glossy sheen and a subtle, buttery finish that makes the dessert feel luxurious. It also helps the mixture set faster and prevents ice crystals from forming during freezing. If you’re avoiding saturated fats, use a neutral oil like grapeseed instead, though the flavor will be slightly altered.
Almonds or Peanuts: The nuts provide crunch and a nutty contrast that breaks the smoothness, giving the dessert a satisfying bite. They also add protein and healthy fats, making the treat more satiating. If you’re looking for a different crunch, try pistachios or hazelnuts for a unique twist.
Everything's prepped? Good. Let's get into the real action...
The Method — Step by Step
- Step 1: Begin by peeling and slicing the ripe bananas into 1/2‑inch thick rounds. The bananas should be soft but not mushy—think banana that’s just starting to brown on the outside. Place them in a blender and pulse until a smooth puree forms. This puree will serve as the creamy foundation, so take your time to get it silky. If you’re short on time, a food processor works just as well.
- Step 2: In a small saucepan, toast the instant coffee over medium heat for about one minute, stirring constantly. The coffee should emit a nutty aroma, indicating that the oils have released their flavor. Remove from heat and let it cool to room temperature. This step is critical; fresh coffee can taste bitter, while toasted coffee adds depth. If you’re in a hurry, skip the toasting but be prepared for a slightly sharper taste.
- Step 3: In a mixing bowl, combine the banana puree, coconut cream, and the cooled toasted coffee. Whisk until the mixture is uniform and the coffee is fully incorporated. The batter should have a thick, custard‑like consistency. This is the moment of truth—if the mixture feels too runny, add a splash of maple syrup to thicken.
- Step 4: Add the peanut butter, maple syrup (base), cocoa powder, and melted coconut oil to the batter. Stir until the peanut butter is fully blended and the cocoa powder is evenly dispersed. The mixture should look glossy and slightly thickened. The peanut butter not only adds flavor but also helps bind the ingredients together. If you find the batter too thick, add a tablespoon of water to loosen it.
- Step 5: Fold in the chopped almonds or peanuts, reserving a handful for topping. These nuts will give the dessert a pleasant crunch and a nutty finish. Make sure the nuts are evenly distributed; otherwise, you’ll have a nut‑heavy bite in one spot and a bland bite in another. If you prefer a more subtle nut flavor, use only the reserved nuts for topping.
- Step 6: Pour the batter into silicone ice cream molds or a lined baking dish. The molds should be chilled beforehand to help the mixture set faster. Fill each mold to the top, but leave a small gap to prevent overflow during freezing. If you’re using a baking dish, line it with parchment paper for easy removal.
- Step 7: Place the filled molds in the freezer for 30 minutes. This initial chill sets the outer layer, creating a firm shell that holds the softer interior. After 30 minutes, remove the molds and give them a gentle shake to release any trapped air bubbles. The batter should still feel slightly pliable at this point.
- Step 8: Return the molds to the freezer and let them freeze for an additional 2–3 hours, or until the bars are firm but still slightly soft to the touch. The interior should be creamy, while the edges are crisp. This dual texture is what makes this dessert special. If the bars freeze too hard, let them sit at room temperature for a few minutes before serving.
- Step 9: Watch Out: When removing the bars from the molds, apply a light oil spray or run a butter knife around the edges to prevent sticking. If you force them out, the bars may crack or break. Once out, dust the tops with a little cocoa powder or drizzle with maple syrup for an extra touch of sweetness. This final touch adds a visual pop and a flavor boost.
- Step 10: Serve immediately, or store in an airtight container in the fridge for up to five days. For a richer flavor, let the bars sit at room temperature for 10 minutes before slicing. If you prefer a colder bite, keep them in the freezer and let them thaw slightly before serving. Remember, the coffee flavor intensifies over time, so the longer you let them sit, the more complex the taste.
That’s it — you did it. But hold on, I’ve got a few more tricks that will take this to another level, turning a simple dessert into a showstopper.
Insider Tricks for Flawless Results
The Temperature Rule Nobody Follows
The key to a silky, lump‑free batter is to keep everything at room temperature before mixing. If the coconut cream or peanut butter is too cold, the batter will seize and become gritty. Let the ingredients sit on the counter for about 15 minutes before combining them. This simple step ensures a smooth, glossy finish that’s a pleasure to eat.
Why Your Nose Knows Best
Before you freeze, give the batter a quick sniff. A strong coffee aroma indicates that the coffee has fully integrated. If the scent feels weak, add a splash of espresso or a pinch more instant coffee. Your nose is the best judge of flavor balance, so trust it. This tweak can transform a bland dessert into a coffee‑infused masterpiece.
The 5‑Minute Rest That Changes Everything
After the first 30 minutes in the freezer, let the bars rest at room temperature for exactly five minutes before refreezing. This brief pause allows the surface to set properly while the interior stays creamy. If you skip this step, the bars can develop ice crystals that ruin the texture. I’ve seen friends who ignored it end up with a grainy dessert that feels like a frozen sponge.
Crunch Control
If you want a more pronounced nut crunch, toast the almonds or peanuts lightly in a dry skillet before folding them in. Toasting brings out their natural oils and adds a subtle caramel flavor that pairs beautifully with coffee. Be careful not to burn them; a few minutes on medium heat is enough. The result is a crunchy, aromatic bite that elevates the dessert.
Maple Syrup Magic
Maple syrup not only sweetens but also helps the mixture set by adding viscosity. For a richer taste, use pure maple syrup instead of light or golden. If you’re looking for a lower‑calorie option, substitute half the maple syrup with honey; the flavor will shift slightly but remain delightful. Remember, the syrup should be at room temperature to blend smoothly.
Freezing the Perfect Bite
The ideal freezing method is a two‑step process: chill for 30 minutes, then freeze for 2–3 hours. This approach prevents the mixture from becoming too hard while ensuring the edges set firmly. If you’re in a hurry, you can skip the first chill and freeze for 3 hours straight, but the texture may be less desirable. Always test a single bar before committing to a full batch.
Creative Twists and Variations
Espresso‑Infused Caramel Bars
Swap the instant coffee for a shot of espresso and drizzle a caramel sauce over the finished bars. The espresso adds a robust depth, while the caramel introduces a buttery sweetness that contrasts the coffee’s bitterness. Use a homemade caramel sauce for an extra touch of indulgence. This version is perfect for coffee lovers who enjoy a sweet, buttery finish.
Chocolate‑Lover’s Delight
Increase the cocoa powder to 1/2 cup and add a tablespoon of unsweetened chocolate chips. The extra chocolate will give the dessert a rich, velvety flavor that pairs wonderfully with coffee. Serve with a dusting of cocoa powder or a drizzle of dark chocolate ganache. This twist is ideal for chocolate and coffee enthusiasts alike.
Almond‑Butter Twist
Replace the peanut butter with almond butter for a milder, nutty flavor that complements the coffee. Almond butter also provides a slightly sweeter profile, which balances the bitterness of the coffee. If you want an extra nutty crunch, add chopped almonds on top before freezing. This variation is a great option for peanut‑allergic guests.
Vegan‑Friendly Edition
Use coconut milk instead of coconut cream and a dairy‑free peanut butter to keep the dessert completely plant‑based. The coconut milk will make the texture a bit lighter, but the flavor remains rich. Add a dash of vanilla extract to enhance the sweetness. This version is perfect for vegan friends who still crave a coffee‑infused treat.
Spiced Cinnamon Surprise
Add 1 teaspoon of ground cinnamon to the batter for a warm, spicy note that pairs wonderfully with coffee. The cinnamon also adds a subtle sweetness that balances the bitterness. Sprinkle a pinch of cinnamon on top before freezing for a decorative touch. This twist is ideal for autumn gatherings or cozy evenings.
Berry‑Burst Variation
Fold in a handful of frozen blueberries or raspberries before freezing. The berries will burst with flavor as you bite into the bars, adding a fruity contrast to the coffee. Be sure to thaw the berries slightly to avoid excessive liquid. This variation is great for those who want a fruit‑infused coffee dessert.
Storing and Bringing It Back to Life
Fridge Storage
Store the bars in an airtight container in the refrigerator for up to five days. The cold environment keeps them firm yet creamy. Before serving, let the bars sit at room temperature for 10 minutes to soften slightly. This short rest enhances the texture and brings out the coffee flavor.
Freezer Friendly
For long‑term storage, keep the bars in the freezer for up to three months. Wrap each bar individually in parchment paper and place them in a freezer bag. When ready to serve, remove a bar and let it thaw for 15 minutes. The bars will retain their texture and flavor, making them a convenient treat for busy mornings.
Best Reheating Method
To warm the bars without melting them, place them in a microwave on low power for 10–15 seconds. Alternatively, wrap the bars in a damp paper towel and heat for 20 seconds. The damp towel prevents the bars from drying out and keeps the texture silky. This method is perfect for a quick snack or dessert.
Rehydration Trick
If the bars have hardened in the freezer, add a tiny splash of water to the surface before microwaving. The water steams and softens the exterior, restoring the original creamy consistency. Be careful not to add too much water, or the bars may become soggy. This trick is a lifesaver for frozen desserts that have lost their luster.