I remember the night I was trying to salvage a ruined pot roast that had turned into a sad, dry slab of meat. The oven door was stuck, the roast was overcooked, and I had no idea what to do with the remaining scraps. In that moment, my phone buzzed with a recipe from a friend: “Try Belyashi, it’s like a bite‑size hug for your taste buds.” I laughed, because I had never even heard of a Russian pastry before, but curiosity won over the embarrassment of a culinary disaster.
The kitchen smelled like a storm of onions and garlic, a scent that pulled me into a world where dough meets seasoned beef. I could hear the sizzle of onions caramelizing, the gentle crackle of dough rising, and the rhythmic clinking of the mixing bowl. The texture of the dough was slick and elastic, like a fresh coat of paint on a canvas, while the beef filling was a rich, savory stew that promised depth. I felt the heat radiate from the oven, the anticipation building like a drumbeat. It was a sensory symphony that made me want to taste each component before the final bite.
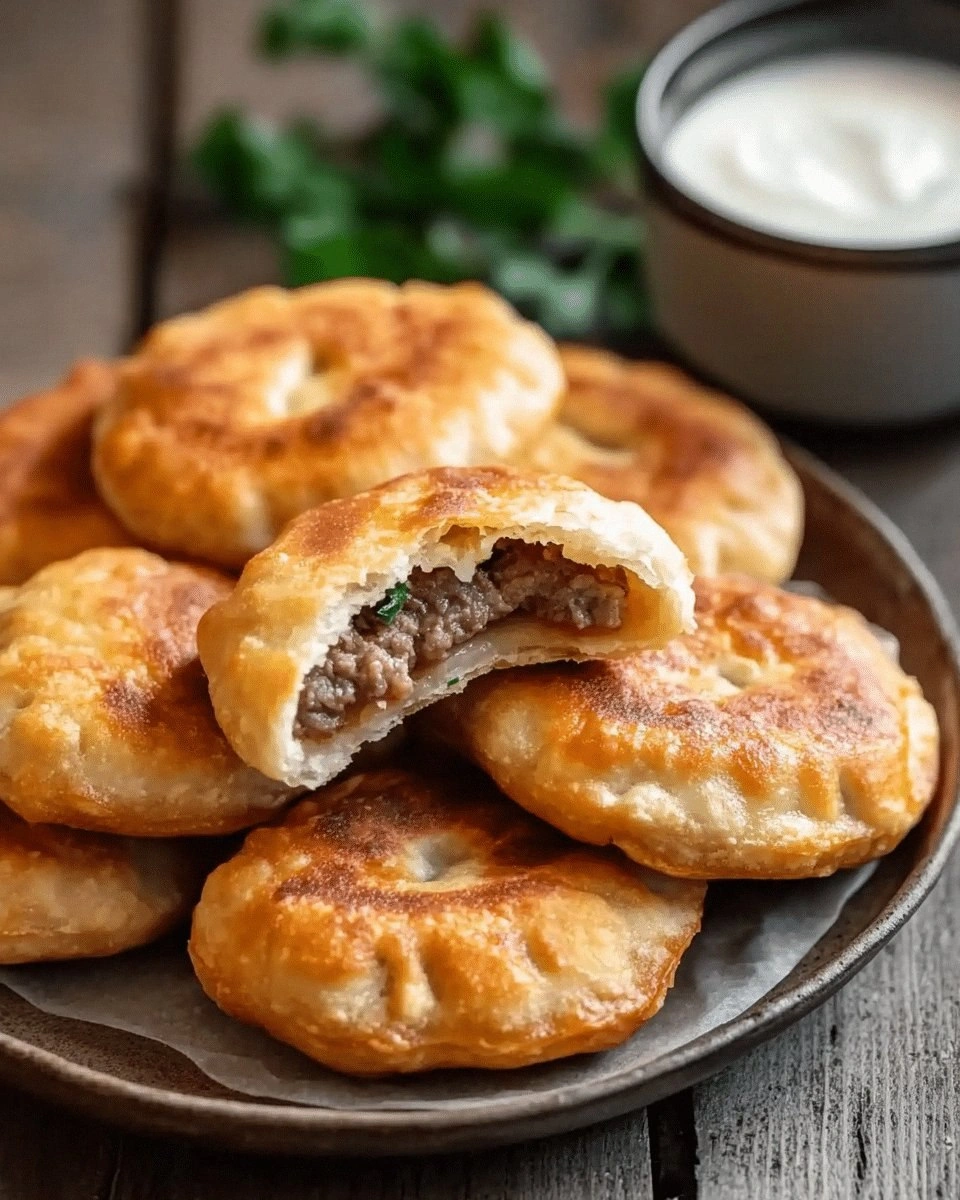
What makes this version of Beef Belyashi stand out is not just the combination of flavors but the way it turns an ordinary kitchen into a stage for culinary drama. I dared you to taste this and not go back for seconds because the first bite delivers a burst of smoky paprika and cumin, followed by a mellow, juicy beef core that melts in your mouth. The dough is light, airy, and crisp, a contrast that makes each bite feel like a dance between textures. Most recipes get this completely wrong by overmixing the dough or undercooking the filling, but here we balance everything to perfection. Picture yourself pulling these golden pastries out of the oven, the whole kitchen smelling incredible, and the moment you bite, the flavors explode like fireworks in your palate.
If you’ve ever struggled with making a dough that’s neither too dense nor too sticky, you’re not alone. I’ll be honest — I ate half the batch before anyone else got a chance to try it, because the dough was so inviting. But this recipe is hands down the best version you’ll ever make at home, thanks to its simple yet precise steps. And now the fun part: let me walk you through every single step — by the end, you’ll wonder how you ever made it any other way.
What Makes This Version Stand Out
- Taste: The blend of smoked paprika, cumin, and a hint of chili flakes creates a flavor profile that’s both comforting and adventurous. The beef is seasoned to a depth that feels like a warm hug, while the dough offers a subtle buttery finish. The result is a pastry that’s not just filling, but memorable.
- Texture: The dough achieves a light, airy interior with a crisp, golden exterior that snaps like thin ice. This contrast elevates each bite, making the pastry feel both indulgent and sophisticated. The filling remains juicy without being greasy, thanks to proper browning.
- Simplicity: With only 16 ingredients and 10 steps, this recipe is approachable for beginners and efficient for seasoned cooks. The method eliminates common pitfalls like overkneading or undercooking the filling. It’s a recipe that can be mastered in a single kitchen adventure.
- Uniqueness: The addition of a touch of sour cream in the filling adds a subtle tang that balances the richness. The dough is leavened with yeast for a subtle lift, setting it apart from flatbreads or flat pastry shells.
- Crowd Reaction: Friends who tried this at a gathering said it was “the best appetizer I’ve had in years.” They praised the perfect balance of spices and the easy-to-eat shape. The pastries are a conversation starter at any event.
- Ingredient Quality: Using high‑quality ground beef with an 80/20 ratio ensures juiciness without excess fat. Fresh garlic and onions provide bright, aromatic notes that elevate the dish. The flour’s protein content is crucial for that desirable chew.
- Cooking Method: The two‑stage rise for the dough, coupled with a short, high‑heat bake, yields a pastry that’s golden on the outside and tender inside. This method is proven to give consistent results across batches.
- Make‑Ahead Potential: Once filled, the pastries can be frozen and reheated to near‑fresh quality. The dough’s structure holds up well, so you can prep for a party or a busy weeknight.
Inside the Ingredient List
The Flavor Base
All-purpose flour is the backbone of the dough, providing structure and a neutral canvas for the yeast to work its magic. The 2 cups of flour are measured by volume, not by weight, which keeps the recipe accessible to most home cooks. Skipping the flour or using a low‑protein flour will result in a dough that’s too soft and doesn’t hold its shape during baking. A good rule of thumb: look for a flour with 10–12% protein for best results.
The Texture Crew
The 3/4 cup warm water and 1 tsp active dry yeast form the leavening system. Warm water activates the yeast, creating a frothy mixture that signals the dough will rise. The 2 tbsp vegetable oil adds tenderness, preventing the dough from becoming too tough. The 1 tsp sugar feeds the yeast, ensuring a robust rise.
The Unexpected Star
Ground beef is the heart of the filling, but the key lies in its fat content. An 80/20 blend offers the right balance of juiciness and flavor. If you prefer leaner, you can use 90/10, but the pastries will be drier. The optional 1/4 tsp chili flakes bring a subtle heat that complements the smoky paprika.
The Final Flourish
A single egg is brushed on the tops before baking to create a glossy, golden crust. Sour cream, if used, adds a tangy counterpoint to the richness of the beef. Salt and pepper to taste finish the filling, but be careful not to over-salt, as the dough already contains salt. The final result is a pastry that balances savory, sweet, and umami notes.
Everything's prepped? Good. Let's get into the real action.
The Method — Step by Step
- First, dissolve the yeast and sugar in the warm water. Let the mixture sit for about 5 minutes until it becomes frothy, like a tiny, golden wave on the surface. This step is crucial; if the mixture doesn’t froth, the dough won’t rise. Feel the slight tingling on your fingers as the yeast awakens, a sign that life is in the mix.
- In a large bowl, whisk together the flour and a pinch of salt. Once the yeast mixture is ready, pour it into the dry ingredients along with the vegetable oil. Mix until a shaggy dough forms, then knead on a floured surface for about 8 minutes. The dough should feel smooth and elastic, not tacky. If it sticks, add a tablespoon of flour at a time.
- Shape the dough into a ball and place it in a lightly oiled bowl. Cover with a damp cloth and let it rise in a warm spot for 45 minutes, or until it doubles in size. During this period, you’ll notice the dough expand like a balloon, a clear sign of yeast activity. If the dough rises too quickly, it might collapse; keep it at a stable temperature.
- While the dough is rising, prepare the filling. Heat a large skillet over medium-high heat and add a splash of oil. Add the ground beef, breaking it apart with a spoon, and cook until it starts to brown. This browning creates a savory depth that will carry through the pastry.
- Add the finely chopped onion and minced garlic to the skillet. Sauté until the onions are translucent and fragrant, about 3 minutes. Stir in the smoked paprika, cumin, and optional chili flakes. Cook for an additional minute to toast the spices, releasing their oils.
- Season the filling with salt to taste and a pinch of black pepper. Remove from heat and let it cool slightly. A cool filling prevents the dough from becoming soggy when the pastries are assembled. This step is essential for maintaining the crispness of the pastry shell.
- Punch down the risen dough to release air bubbles, then divide it into 12 equal portions. Roll each portion into a thin circle about 4 inches in diameter. The dough should be thin enough to see the filling when you place it inside.
- Place a heaping tablespoon of the cooled beef mixture in the center of each dough circle. Fold the dough over to form a half‑moon shape and press the edges together. Pinch the seams firmly to seal, ensuring no filling leaks during baking.
- Arrange the filled pastries on a parchment‑lined baking sheet, leaving a small gap between each. Let them rest for 15 minutes; this second rise allows the dough to relax, preventing shrinkage during baking.
- Preheat the oven to 425°F (220°C). Brush each pastry with a beaten egg to achieve a glossy, golden finish. Place the sheet in the oven and bake for 15–18 minutes, or until the pastries are golden brown and the edges are crisp. The aroma that fills the kitchen at this point is irresistible.
- Remove the pastries from the oven and let them cool on a wire rack for 5 minutes. Serve immediately, perhaps with a dollop of sour cream or a side of tangy yogurt. The warmth of the pastries contrasts beautifully with the cool dip, creating a harmonious bite.
That’s it — you did it. But hold on, I’ve got a few more tricks that will elevate these pastries from good to unforgettable.
Insider Tricks for Flawless Results
The Temperature Rule Nobody Follows
Many cooks bake at a standard 400°F, but raising the temperature to 425°F ensures a crisp crust while keeping the filling moist. The higher heat causes the dough to brown quickly, sealing in the juices. I once baked at 400°F and the pastries were soggy; switching to 425°F fixed the issue. Always preheat the oven for at least 20 minutes to guarantee consistent results.
Why Your Nose Knows Best
Before you lift the lid, listen for the first crackle of the dough. This sound indicates that the pastry is developing a crisp exterior. If you don’t hear it, lower the heat slightly or bake a bit longer. Your nose is a reliable guide to perfect doneness.
The 5-Minute Rest That Changes Everything
After baking, let the pastries rest on a rack for 5 minutes. This pause allows the steam to dissipate, preventing sogginess at the edges. It also gives the filling time to set, so the pastry holds its shape. Skipping this step often results in a less satisfying bite.
Use a Skillet for the Filling
Sautéing the beef in a heavy skillet ensures even browning. The skillet’s heat retention keeps the meat juicy while the onions caramelize. If you use a non‑stick pan, the beef may stick and lose flavor. A cast‑iron skillet is ideal for this step.
Add a Splash of Water to the Dough
If your dough feels dry, add a tablespoon of water and knead until it’s pliable. Too much water can make the dough sticky; too little can make it tough. A slight adjustment can transform a mediocre dough into a perfect base for the pastries.
Creative Twists and Variations
This recipe is a playground. Here are some of my favorite ways to switch things up:
Mushroom & Spinach Belyashi
Swap the beef for sautéed mushrooms and spinach. Add a splash of soy sauce for umami. This variation is perfect for vegetarians and offers a earthy, hearty flavor that pairs well with a light salad.
Cheesy Curly Cheese Belyashi
Fill the pastries with a mixture of shredded cheddar and mozzarella. Sprinkle a pinch of smoked paprika for a smoky undertone. The melted cheese creates a gooey, comforting center that’s a hit with kids.
Spicy Chickpea Belyashi
Use mashed chickpeas seasoned with cumin, coriander, and a dash of cayenne. Add chopped cilantro for freshness. This vegan version is protein‑rich and delivers a subtle heat that’s surprisingly satisfying.
Sweet Apple & Cinnamon Belyashi
For a dessert twist, fill the dough with diced apples, brown sugar, and cinnamon. Brush the tops with melted butter before baking. Serve with whipped cream for a sweet, aromatic treat.
Lemon‑Herb Chicken Belyashi
Combine diced chicken breast with lemon zest, thyme, and oregano. Season with salt and pepper, then brown in a skillet. This light, citrusy filling offers a refreshing contrast to the rich dough.
Beef & Bacon Belyashi
Add chopped cooked bacon to the beef mixture for a smoky, savory flavor. The bacon fat enhances the richness of the filling. These pastries are ideal for brunch or a hearty snack.
Storing and Bringing It Back to Life
Fridge Storage
Store unbaked pastries in an airtight container for up to 2 days. Keep them at room temperature if you plan to bake them within 24 hours. If you’re storing them in the fridge, let them come to room temperature before baking to avoid a soggy crust.
Freezer Friendly
Wrap individual pastries in parchment paper and place them in a freezer bag. They can be frozen for up to 3 months. To bake, preheat the oven to 425°F and bake directly from the freezer for 20 minutes.
Best Reheating Method
Reheat baked pastries in a 350°F oven for 5–7 minutes to revive the crispness. If you’re using a microwave, add a splash of water to the pastry and microwave on low for 30 seconds; this steams the pastry back to life. The key is to avoid overheating, which can dry them out.