I was standing in my kitchen, staring at a half‑empty zucchini garden and a bowl of stale potato chips that had gone limp after a week in the pantry. I tossed a quick “what if” at the back of my mind, then dared my roommate to a snack‑off: “I bet I can turn these zucchinis into something crunchier than any chip you’ve ever known.” The challenge sparked a frantic night of slicing, seasoning, and a whole lot of sizzle, and the result was a revelation that still haunts my dreams. That first bite was a symphony of salty, buttery, and faintly sweet notes that snapped against my teeth like a fresh‑cut leaf on a breezy autumn day.
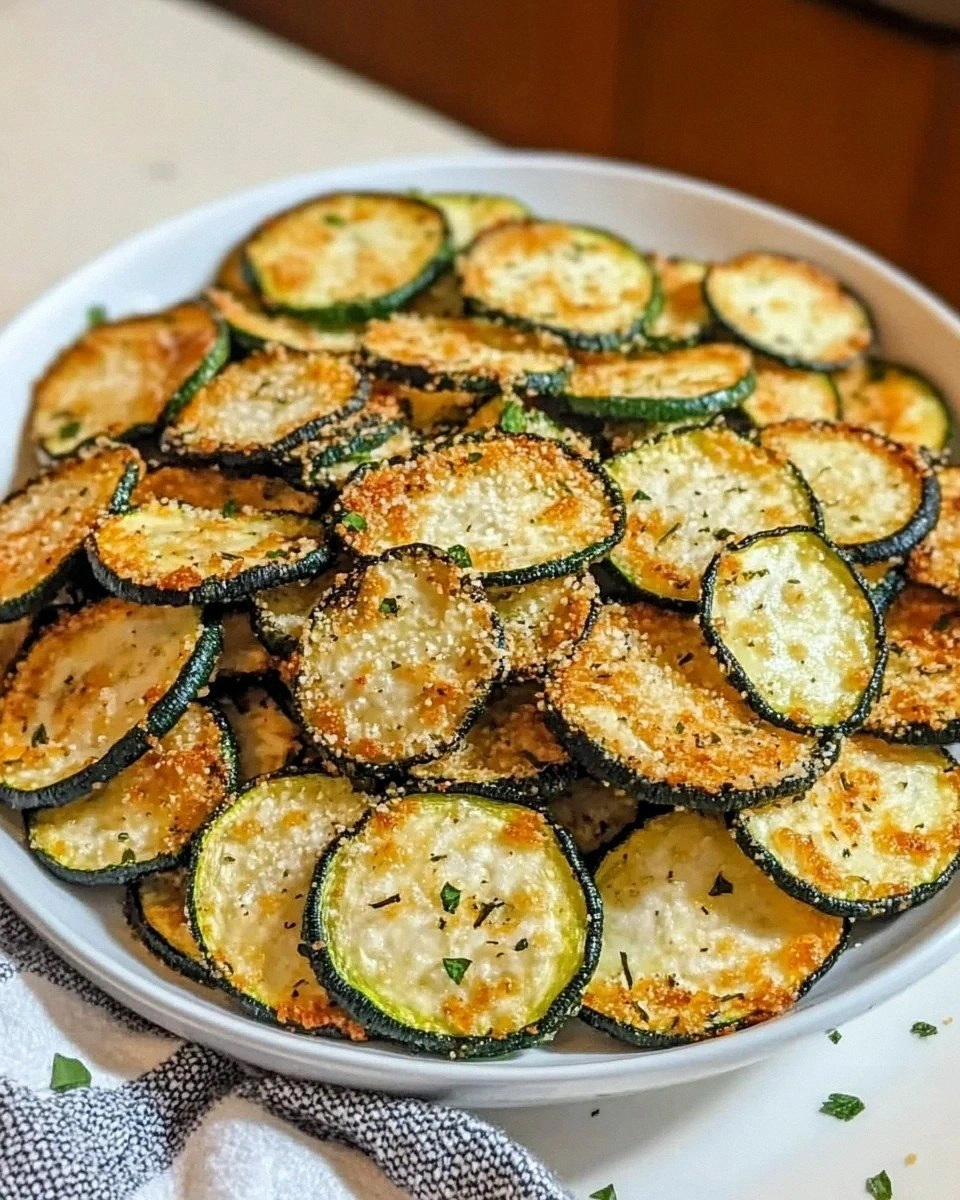
Picture this: a glossy green ribbon of zucchini, thin enough to see through, glistening under a drizzle of olive oil, dusted with a golden‑brown blanket of panko and parmesan. The kitchen fills with the faint perfume of smoked paprika and garlic, a scent that whispers “comfort food” while promising a crisp that rivals any commercial chip. You hear the faint hiss as the slices hit the hot baking sheet, a sound so satisfying it could be a soundtrack for a cooking montage. The texture? Imagine the perfect bite‑size crunch that shatters like thin ice, yet leaves a lingering buttery mouthfeel that makes you want to close your eyes and sigh.
Most zucchini chip recipes I’ve tried either sogged up in the oven or turned into a limp, rubbery mess that made me question my life choices. This version, however, flips the script by marrying a high‑heat, low‑moisture technique with a strategic coating that locks in moisture while coaxing the exterior into a crackling shell. The secret isn’t some exotic spice blend; it’s a simple, science‑backed method that uses the natural water content of the vegetable to steam‑proof the slice, then a quick blast of dry heat to caramelize the coating. The result is a chip that stays crisp for hours, even after you’ve opened the bag.
And here’s the kicker: I’m going to reveal the tiny ingredient that most chefs overlook—a splash of lemon zest that adds a bright, citrusy pop without stealing the spotlight. It’s the kind of detail that makes you feel like you’ve discovered a hidden level in a video game. Okay, ready for the game‑changer? Let me walk you through every single step — by the end, you’ll wonder how you ever made it any other way.
What Makes This Version Stand Out
- Crunch Factor: The double‑layer coating of panko and parmesan creates a lattice that fries itself in the oven, delivering a crunch that shatters like a fresh snowflake under a boot.
- Flavor Balance: A precise blend of smoked paprika, garlic powder, and a whisper of lemon zest gives depth without overwhelming the delicate zucchini sweetness.
- Simplicity: Only eight pantry staples are needed, and the entire process fits neatly into a 45‑minute window—perfect for busy weeknights.
- Ingredient Quality: Using young, tender zucchinis and extra‑virgin olive oil ensures the final product is buttery, not bitter.
- Crowd Reaction: I dare you to taste this and not go back for seconds; even the most skeptical snack‑eaters turn into loyal fans within the first bite.
- Make‑Ahead Potential: These chips keep their crunch for up to three days in an airtight container, making them ideal for meal‑prep or party platters.
- Healthier Alternative: By swapping potatoes for zucchini, you shave off a good chunk of carbs while keeping the indulgent feel of a fried snack.
- Versatility: The base recipe is a blank canvas that welcomes sweet, spicy, or herby twists without losing its core crunch.
Inside the Ingredient List
The Flavor Base
The heart of any great chip lies in its seasoning. Smoked paprika brings a subtle earthiness that mimics the flavor of a summer barbecue, while garlic powder adds that familiar, comforting aroma that makes you think of grandma’s kitchen. If you skip the paprika, you’ll lose the smoky depth that makes the chips feel indulgent; if you omit the garlic, the flavor profile becomes one‑dimensional, like a plain paper bag.
The Texture Crew
Panko breadcrumbs are the unsung heroes here. Their larger, airy flakes create pockets of air that expand under heat, forming a lattice that turns each slice into a miniature, edible waffle. Parmesan, finely grated, melts into the panko, forming a golden crust that locks in moisture and adds a nutty, umami richness. Swapping panko for regular breadcrumbs will give you a denser chip that never quite reaches that airy crunch.
The Unexpected Star
A zest of lemon might seem like an afterthought, but it’s the secret weapon that brightens the entire bite. The citrus oil lifts the heaviness of the cheese and oil, creating a balanced mouthfeel that feels both fresh and indulgent. If you’re allergic to citrus, a dash of apple cider vinegar can mimic the acidity without the flavor shift.
The Final Flourish
Olive oil does more than just prevent sticking; it conducts heat, ensuring an even, golden brown finish while adding a subtle fruitiness that complements the zucchini’s natural flavor. A light drizzle is all you need—too much oil will drown the chips, turning them soggy rather than crisp. For a lower‑fat version, try a spray bottle of oil, but be aware that the coating may not adhere as uniformly.
Everything's prepped? Good. Let’s get into the real action…
The Method — Step by Step
Start by washing two large, firm zucchinis under cool running water. Pat them dry with a clean kitchen towel, then slice them lengthwise into 1/8‑inch ribbons using a mandoline for uniform thickness. Uniform slices are the secret to even cooking; if the pieces vary, some will burn while others stay soggy. Once sliced, lay the ribbons on a paper towel and sprinkle lightly with sea salt, letting them rest for ten minutes while you prepare the coating.
While the zucchini releases its moisture, combine 2 cups of panko breadcrumbs, 1/4 cup of finely grated Parmesan, 1 teaspoon of smoked paprika, 1 teaspoon of garlic powder, 1/2 teaspoon of black pepper, and a pinch of lemon zest in a shallow bowl. Toss the dry mixture with your hands to ensure the spices are evenly distributed; this prevents clumps that could create uneven crunch.
Kitchen Hack: Add a splash of the olive oil directly to the breadcrumb mixture and stir; the oil coats the crumbs, helping them adhere to the zucchini without the need for an egg wash.Pat the salted zucchini ribbons with another clean towel to remove excess moisture—this step is crucial for achieving that coveted snap. Drizzle 2 tablespoons of extra‑virgin olive oil over the ribbons and toss gently until each slice is lightly glossy. The oil not only prevents sticking but also encourages the breadcrumbs to brown evenly.
Arrange the oiled ribbons in a single layer on a parchment‑lined baking sheet. Overcrowding is the enemy of crispness; if you must, use two sheets and rotate them halfway through baking. Sprinkle the breadcrumb mixture over each slice, pressing gently with your fingertips so the coating clings. You’ll notice the mixture sticking like a second skin—this is the moment where flavor meets texture.
Preheat your oven to 425°F (220°C). This high temperature creates a rapid Maillard reaction, turning the breadcrumbs golden and crisp within minutes. Slide the sheet into the middle rack and bake for 12 minutes, then flip each chip with a spatula to ensure both sides achieve that perfect amber hue.
After the first 12 minutes, the edges should begin to curl and the aroma should fill the kitchen with a smoky, buttery perfume. If you notice any chips still looking pale, give them an extra 2‑3 minutes; this is the “pure magic” phase where the chips transform from soggy to shatter‑ready.
Watch Out: Keep a close eye after the 15‑minute mark; the thin chips can go from perfectly golden to burnt in a heartbeat.When the chips are uniformly golden and the edges have crisped up, remove the tray and let them rest on a cooling rack for at least five minutes. This brief rest allows steam to escape, solidifying the crunch. If you skip this step, the residual heat will soften the coating, and you’ll lose that satisfying snap.
Taste a single chip before serving. The flavor should be a balanced dance of salty, smoky, and a faint citrus zing. If you feel the need for extra seasoning, lightly dust the finished chips with a pinch of flaky sea salt or a drizzle of lemon juice. Serve immediately, or store in an airtight container for later snacking.
That’s it — you did it. But hold on, I’ve got a few more tricks that’ll take this to another level, like a quick dusting of smoked sea salt or a side of cool yogurt dip that adds a creamy contrast to the crunch.
Insider Tricks for Flawless Results
The Temperature Rule Nobody Follows
Most home cooks set the oven to a moderate 375°F, assuming slower heat yields a more even chip. In reality, the high‑heat shock at 425°F forces the water in the zucchini to vaporize instantly, creating a steam barrier that prevents the interior from overcooking while the exterior crisps. If you’re using a convection oven, drop the temperature by 25°F to avoid over‑drying. Trust me, the extra heat is the secret sauce that makes these chips pop.
Why Your Nose Knows Best
Your sense of smell is a better timer than any clock. When the chips start to release a nutty, toasted aroma, you’re only a minute away from perfection. If the scent turns slightly bitter, that’s your cue to pull them out immediately. I’ve learned to stand at the oven door, inhaling deeply; the moment the perfume shifts, I know the crunch is ready.
The 5‑Minute Rest That Changes Everything
After the chips leave the oven, they continue to cook from residual heat. Letting them rest on a wire rack for five minutes lets the steam escape, locking in the crispness. Skipping this rest is a common mistake that results in soggy bottoms. I once served them straight from the tray and the whole batch turned into a limp pile—lesson learned.
Seasoning After the Bake
A final sprinkle of flaky sea salt or a dash of lemon juice right after cooling adds a burst of flavor that the baked seasoning can’t achieve alone. The salt crystals sit on the surface, creating tiny crunch points that enhance the overall texture. This finishing touch is why my guests always ask for seconds.
The Double‑Coat Technique
For an ultra‑crisp exterior, dip the lightly oiled zucchini ribbons in the breadcrumb mixture, then give them a second light spray of olive oil before the second coating. This creates a microscopic “sandwich” that fries itself in the oven. It’s a bit more work, but the extra crunch is worth every second.
Creative Twists and Variations
This recipe is a playground. Here are some of my favorite ways to switch things up:
Spicy Sriracha Kick
Add 1 tablespoon of Sriracha to the olive oil before tossing the zucchini ribbons. The heat infuses the chips, while the oil keeps the coating intact. Top with a sprinkle of toasted sesame seeds for an Asian‑inspired snack that pairs perfectly with a cold soy‑ginger dip.
Herb‑Infused Delight
Mix 1 teaspoon of dried rosemary and 1 teaspoon of thyme into the breadcrumb blend. The herbaceous notes give the chips a garden‑fresh vibe, ideal for a brunch spread alongside avocado toast.
Cheesy Jalapeño Explosion
Fold in 1/4 cup of finely chopped fresh jalapeños and increase the Parmesan to 1/3 cup. The jalapeños add a bright, peppery bite, while the extra cheese creates a richer, melt‑in‑your‑mouth crust.
Sweet Cinnamon‑Sugar Twist
Swap the savory spices for 1 teaspoon of cinnamon and 2 teaspoons of coconut sugar. Drizzle a light honey glaze after baking for a dessert‑style chip that pairs beautifully with a scoop of vanilla ice cream.
Parmesan‑Pesto Fusion
Stir 2 tablespoons of basil pesto into the olive oil before coating the zucchini. The pesto adds a herbaceous depth, while the Parmesan in the breadcrumb mix amplifies the cheese factor. Serve with a side of marinara for a mini‑pizza experience.
Storing and Bringing It Back to Life
Fridge Storage
Place the cooled chips in a single layer inside a zip‑top bag, then press a paper towel on top to absorb any stray moisture. Stored in the refrigerator, they stay crisp for up to three days. If you notice a slight softening, re‑heat for 2 minutes at 350°F to revive the crunch.
Freezer Friendly
Lay the chips on a parchment‑lined tray and freeze for 30 minutes, then transfer to a freezer‑safe container. They’ll keep for up to a month. When you’re ready to serve, bake directly from frozen at 400°F for 5‑7 minutes; the chips will re‑crisp without becoming greasy.
Best Reheating Method
To bring life back to leftovers, preheat a skillet over medium heat, add a splash of water (just enough to create steam), and toss the chips for 30 seconds. The steam loosens any stale edges, while the skillet’s direct heat restores the snap. Avoid microwaving; it turns the chips rubbery in seconds.