Picture this: a rainy Saturday afternoon, the kind where the clouds look like someone spilled a bucket of gray paint across the sky, and you’re stuck in the kitchen with a sudden craving that refuses to be ignored. I was scrolling through endless dessert videos, each promising “the ultimate bite,” when my phone buzzed with a dare from my roommate – “Make something that can win over a chocolate‑obsessed skeptic in one bite.” I laughed, grabbed the nearest white chocolate bar, a bag of frozen raspberries, and a jar of coconut cream, and the rest is delicious history. The first attempt was a mess – the chocolate seized, the raspberries turned into a soupy mess, and I nearly gave up. But then, a lightbulb moment: what if I tempered the white chocolate gently, fold in the coconut cream for silkiness, and give the raspberry a concentrated punch with freeze‑dried powder? That’s how this version was born.
The kitchen filled with the sweet perfume of melting white chocolate, a faint tropical whisper of coconut, and a bright, almost floral zing from the raspberries. I could hear the faint pop of the oven door opening, the gentle clink of a metal spoon against a glass bowl, and the soft sigh of the batter settling into the tray. My fingertips tingled as the warm mixture brushed against the cool silicone mat, and my taste buds were already doing a happy dance. The texture was already promising – a glossy, velvety coating that would harden into a delicate shell, giving way to a chewy, melt‑in‑your‑mouth center that sang of tropical breezes and berry fields.
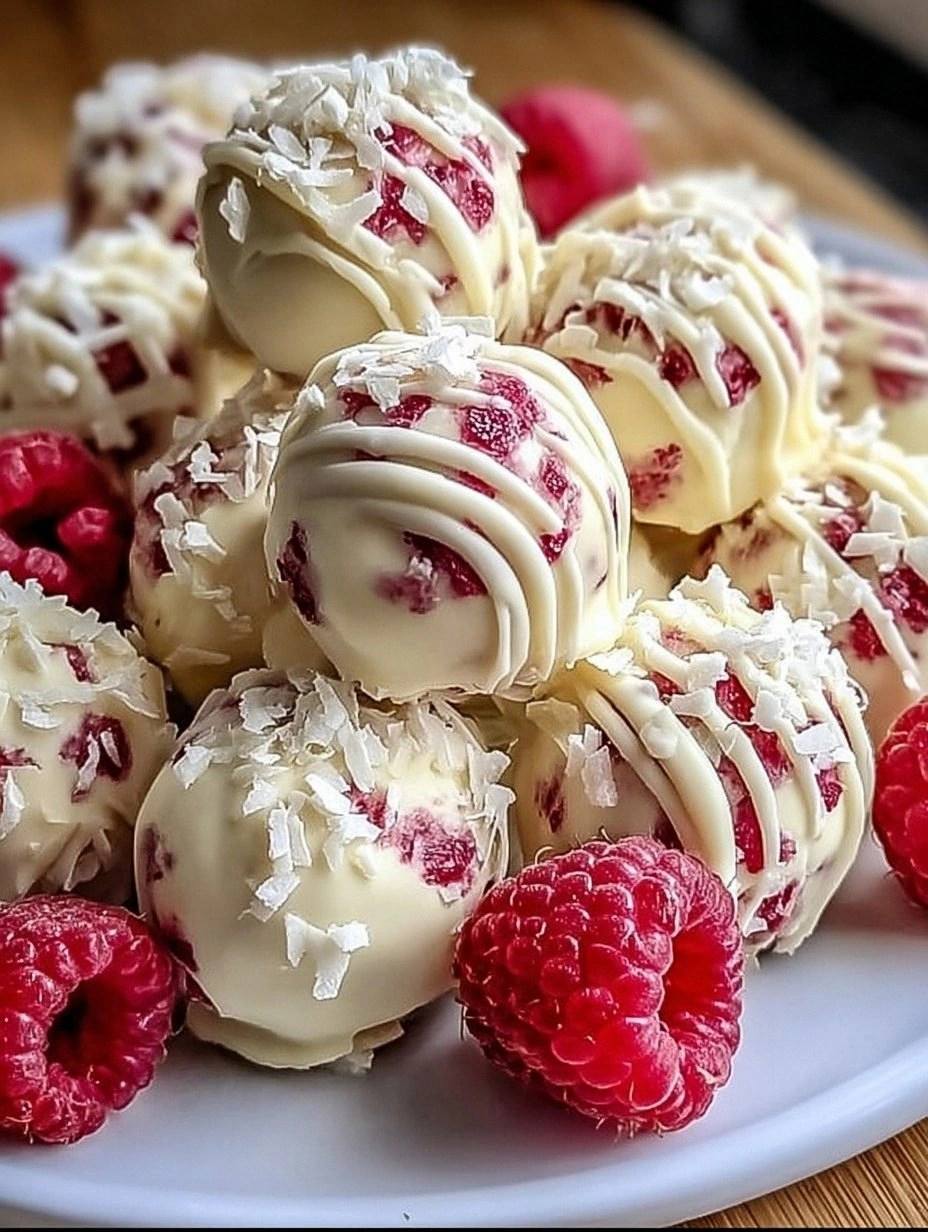
Why does this version stand out from every other truffle recipe you’ve tried? Because it balances three worlds: the luxurious silk of white chocolate, the bright acidity of raspberry, and the chewy, nutty crunch of toasted coconut. Most recipes either drown the fruit in chocolate or forget the coconut altogether, leaving a one‑note experience. Here, each bite is a symphony, and the surprise is that the raspberry doesn’t get lost – it’s amplified by a secret weapon: freeze‑dried raspberry powder that locks in flavor without adding extra moisture. The result is a truffle that looks like a tiny snow‑capped island, yet bursts with summer berries and island vibes.
I’m about to walk you through every single step – from selecting the perfect white chocolate to mastering the perfect roll. By the end, you’ll wonder how you ever made truffles any other way. Okay, ready for the game‑changer?
What Makes This Version Stand Out
- Flavor Explosion: The combination of white chocolate’s buttery sweetness with the tart, bright raspberry creates a contrast that dances on the palate, while toasted coconut adds a subtle caramel note.
- Texture Triple‑Threat: A crisp outer shell, a creamy‑soft middle, and a faint, chewy coconut crunch give you three distinct sensations in one bite.
- Simplicity Meets Sophistication: Only seven core ingredients, yet the technique elevates them to a gourmet level without any fancy equipment.
- Unique Ingredient: Freeze‑dried raspberry powder locks in flavor without extra liquid, a trick most home cooks overlook.
- Crowd‑Pleaser Factor: Even the most skeptical chocolate purist admits these are “the best truffles I’ve ever had,” and they disappear in seconds.
- Ingredient Quality: Using high‑fat white chocolate and fresh coconut cream ensures a glossy finish and a melt‑in‑your‑mouth feel.
- Make‑Ahead Magic: Once formed, the truffles keep beautifully in the fridge for up to a week, making them perfect for parties or gifting.
- Visual Wow: The contrast of white chocolate, ruby‑red raspberry specks, and toasted coconut flecks makes them Instagram‑ready.
Inside the Ingredient List
The Flavor Base
White Chocolate (2 cups shredded, about 8 oz): This is the backbone. High‑fat white chocolate melts smoothly and sets with a glossy snap. If you use low‑fat candy coating, the truffles will be brittle and dull. Swap: A good quality couverture works wonders, but avoid milk chocolate – it’ll mask the raspberry.
Coconut Cream (½ cup): Adds richness and a subtle tropical aroma, making the interior luxuriously creamy. Skipping it makes the truffles dry. Swap: Full‑fat canned coconut milk, but chill and skim the thick layer for best results.
Unsalted Butter (2 Tbsp): Gives the mixture a silkier mouthfeel and helps the chocolate set without cracking. Use room‑temperature butter; melted butter can separate.
The Texture Crew
Powdered Sugar (½ cup): Sweetens without gritty texture, and its fine grains blend seamlessly into the chocolate. If you use granulated sugar, you’ll feel crystals. Swap: Coconut sugar for a caramel twist, but reduce the amount by a tablespoon.
Sweetened Shredded Coconut (1 cup): Provides the signature chew and a toasty flavor when lightly toasted. Skipping this loses the “coconut crunch” that makes these truffles unique. Swap: Desiccated coconut for a drier texture, or toasted almond slivers for a nutty version.
The Unexpected Star
Raspberry Puree (¼ cup): Gives a burst of fresh fruit acidity that cuts through the sweetness. Too much will make the mixture wet; measure precisely. Swap: Strawberry puree for a sweeter profile, but add a splash of lemon juice to keep the balance.
Freeze‑Dried Raspberry Powder (1 tsp): Concentrates raspberry flavor without extra moisture, creating specks that pop in every bite. If you can’t find it, grind freeze‑dried raspberries in a spice grinder.
The Final Flourish
Sea Salt (a pinch): Enhances all flavors and adds a subtle crunch. Too much will dominate, so keep it minimal.
Cocoa Powder (for dusting, optional): Adds a visual contrast and a hint of bitterness that balances the sweetness. Use unsweetened, high‑quality cocoa for best color.
Everything's prepped? Good. Let's get into the real action...
The Method — Step by Step
Start by setting up a double boiler: fill a saucepan with a couple of inches of water, bring it to a gentle simmer, and place a heat‑proof bowl on top, making sure the bottom doesn’t touch the water. Add the shredded white chocolate to the bowl, stirring constantly. As the chocolate begins to melt, you’ll notice a sweet, buttery aroma that fills the kitchen – that’s the first sign you’re on the right track. Keep the heat low; you want a slow, even melt to preserve the glossy finish.
Once the chocolate is completely smooth, remove the bowl from the heat and whisk in the butter until fully incorporated. This step is pure magic – the butter adds silkiness and prevents the chocolate from setting too hard. Then, gently fold in the coconut cream, watching the mixture become glossy and slightly thicker. Watch the texture: it should coat the back of a spoon without dripping.
Watch Out: If the mixture looks grainy, you’ve overheated the chocolate. Return it to the double boiler for a few seconds and stir vigorously to re‑emulsify.Now, sift in the powdered sugar and stir until the mixture is silky and free of lumps. This is where the truffle gains its subtle sweetness without any gritty feel. The mixture should be thick enough to hold its shape when lifted with a spatula but still fluid enough to roll into balls later. I dare you to taste this and not go back for seconds – the balance is that perfect.
Stir in the raspberry puree, followed by the freeze‑dried raspberry powder. The puree adds moisture and a fresh tartness, while the powder creates specks of ruby that will be visible in the final bite. When you swirl the mixture, you’ll see pink ribbons weaving through the white chocolate – a visual promise of the flavor explosion to come.
Fold in the shredded coconut, distributing it evenly. The coconut not only adds texture but also helps the truffles set faster once chilled. If you love a stronger coconut flavor, toast the shredded coconut lightly in a dry pan for 3‑4 minutes before adding – just watch it closely, it can go from golden to burnt in a flash.
Kitchen Hack: Toasting the coconut on low heat and stirring constantly yields an even golden hue without scorching.Cover the bowl with plastic wrap and refrigerate the mixture for 20‑30 minutes. This chilling step is crucial – it firms up the mixture just enough to roll without it melting in your hands. While you wait, pre‑heat your oven to 350°F (175°C) and line a baking sheet with parchment. This is the moment of truth: the cooler the mixture, the cleaner the roll.
After chilling, scoop a tablespoon of mixture and roll it between your palms to form a smooth ball about the size of a large marble. The surface should be glossy and slightly tacky; if it sticks to your hands, dust them lightly with cocoa powder or extra shredded coconut. Place each ball onto the prepared baking sheet, spacing them a little apart. Continue until all mixture is used – you should end up with roughly 20‑24 truffles.
Transfer the tray to the freezer for 10 minutes to set the outer shell. This quick chill creates that satisfying “snap” when you bite into the truffle, sealing in the creamy center. While they’re in the freezer, you can prepare a dusting station: a shallow bowl of cocoa powder, a separate bowl of powdered sugar, and a third bowl of extra toasted coconut.
Remove the truffles from the freezer. One by one, roll each truffle in your chosen coating – cocoa for a dark contrast, powdered sugar for extra sweetness, or coconut for a double coconut punch. The coating should cling lightly; give each truffle a gentle shake to remove excess. This final roll is pure joy – the truffle glides through the powder like a snowball rolling down a hill.
Place the coated truffles back on the parchment and let them sit at room temperature for 5‑10 minutes, then refrigerate for another 15 minutes before serving. This final chill ensures the coating adheres perfectly and the interior stays luscious. And now the fun part: taste a truffle, feel the snap, the melt, the raspberry pop – you’ve just created a bite‑size masterpiece. That's it — you did it. But hold on, I've got a few more tricks that'll take this to another level...
Insider Tricks for Flawless Results
The Temperature Rule Nobody Follows
Never melt white chocolate above 115°F (46°C). Higher temps cause the cocoa butter to separate, leading to a dull, crumbly finish. Keep your double boiler simmering gently and use an instant‑read thermometer to stay in the sweet spot. I once tried a shortcut on the stove top, and the chocolate turned grainy – a lesson learned the hard way.
Why Your Nose Knows Best
Before you even taste, trust your sense of smell. When the chocolate‑coconut mixture is ready, it should emit a buttery, slightly nutty aroma with a faint hint of fruit. If you detect any burnt or oily scent, the mixture is over‑cooked. A quick sniff can save you from a batch of truffles that taste like plastic.
The 5‑Minute Rest That Changes Everything
After rolling each truffle, let them rest for exactly five minutes on the parchment before coating. This short pause allows the surface to dry just enough for the coating to cling without sliding off. Skipping this step results in a coating that flakes off, and nobody wants that.
Cold Hands, Warm Heart
Keep a bowl of ice water nearby and dip your hands in for a few seconds before shaping each ball. Cold hands prevent the chocolate from softening too quickly, giving you tighter, more uniform truffles. I swear, this tiny habit turned my uneven spheres into perfect little pearls.
Double‑Coat for Extra Wow
If you want a show‑stopper, dip each truffle twice – first in cocoa powder, then in toasted coconut. The double layer adds texture contrast and visual appeal. A friend tried this once and called them “the best truffles ever seen at a brunch.”
Creative Twists and Variations
This recipe is a playground. Here are some of my favorite ways to switch things up:
Matcha‑Mint Fusion
Swap the raspberry puree for a tablespoon of matcha powder dissolved in a splash of milk, and add a few drops of peppermint extract. The result is a green‑tinged truffle with an earthy‑minty finish that’s perfect for spring tea parties.
Dark Chocolate Chili Kick
Replace white chocolate with dark chocolate (70% cacao) and add a pinch of cayenne pepper to the mixture. The bitter chocolate balances the heat, creating a sophisticated, slightly spicy bite that’s great for adult gatherings.
Nutty Caramel Crunch
Fold in chopped toasted almonds and a drizzle of caramel sauce into the mixture before chilling. The almonds add a satisfying crunch, while the caramel adds depth, turning the truffle into a mini caramel‑toffee bar.
Berry‑Burst Medley
Use a blend of raspberry, strawberry, and blueberry purees (⅓ each) for a rainbow of flavors. The visual specks become a kaleidoscope, and each bite offers a different fruit nuance.
Vegan Coconut Dream
Replace butter with coconut oil and use a plant‑based white chocolate (coconut‑based). The truffles stay dairy‑free, and the coconut oil adds an extra layer of tropical aroma.
Holiday Spice Edition
Add a pinch of ground cinnamon, nutmeg, and clove to the mixture, and dust the finished truffles with a blend of powdered sugar and a dash of pumpkin spice. Perfect for a cozy winter treat.
Storing and Bringing It Back to Life
Fridge Storage
Place the truffles in an airtight container lined with parchment paper, separating layers with additional parchment to avoid sticking. They’ll stay fresh for up to 7 days, retaining their texture and flavor. If you notice a slight hardening, let them sit at room temperature for 10 minutes before serving.
Freezer Friendly
For longer storage, arrange the truffles on a tray, flash‑freeze for 30 minutes, then transfer to a zip‑top freezer bag. They’ll keep for up to 3 months. When you’re ready to enjoy them, move the bag to the fridge for an hour, then let them sit out for 5 minutes.
Best Reheating Method
To revive a chilled truffle, place it on a microwave‑safe plate, add a tiny splash (about ½ tsp) of water beside it, and microwave on low power (30% power) for 10‑15 seconds. The steam generated restores that melt‑in‑your‑mouth softness without melting the coating.